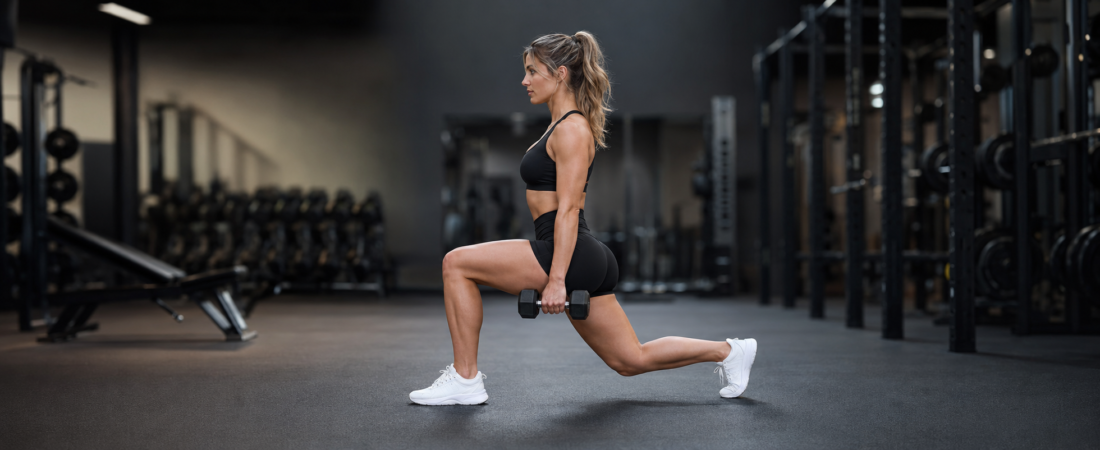
A dumbbell lunge builds balanced legs and a set of glutes that two-legged work alone tends to leave behind — and it does that by making each side prove itself on its own.
Every two-legged lift you do lets your stronger side quietly carry the weaker one. A back squat feels even because your good leg picks up the slack you can’t see. Step onto one leg with a pair of dumbbells and that hiding place disappears.
The catch is that the wobble you feel the first time isn’t the exercise being too hard. It’s information — the movement showing you a gap that was always there, just covered up.
What Is a Dumbbell Lunge?
A dumbbell lunge is a single-leg exercise where you hold a dumbbell in each hand, step into a split stance, and lower until your front thigh is roughly parallel to the floor and your back knee drops toward the ground — then drive back up. Because you’re loaded on one leg at a time, it trains the quads (the front of the thigh), the glutes (your backside), and the hamstrings (the back of the thigh) while your smaller stabilising muscles work overtime just to keep you upright.
The direction you step changes the feel. A reverse lunge — stepping backward — keeps your front shin more upright and is easier on the knees, which makes it the cleanest place to start. A forward lunge puts more braking demand on the front knee, and walking lunges add balance and coordination on top. The mechanics are the same throughout; reverse just gives you the most controllable way in.
What You Need
A pair of dumbbells and enough floor space to step. That’s the whole list. If balance is the limiting factor at first, drop the dumbbells entirely and learn the pattern with bodyweight — you can add load the moment the movement stops being a fight to stay standing.
How To Do It
Stand tall with a dumbbell in each hand, arms relaxed at your sides. Step one foot back into a split stance. Lower under control — bending both knees together — until your front thigh reaches roughly parallel and your back knee hovers just above the floor. Drive through your front foot to stand back up, bringing the back foot in only if you’re doing reverse lunges rep by rep.
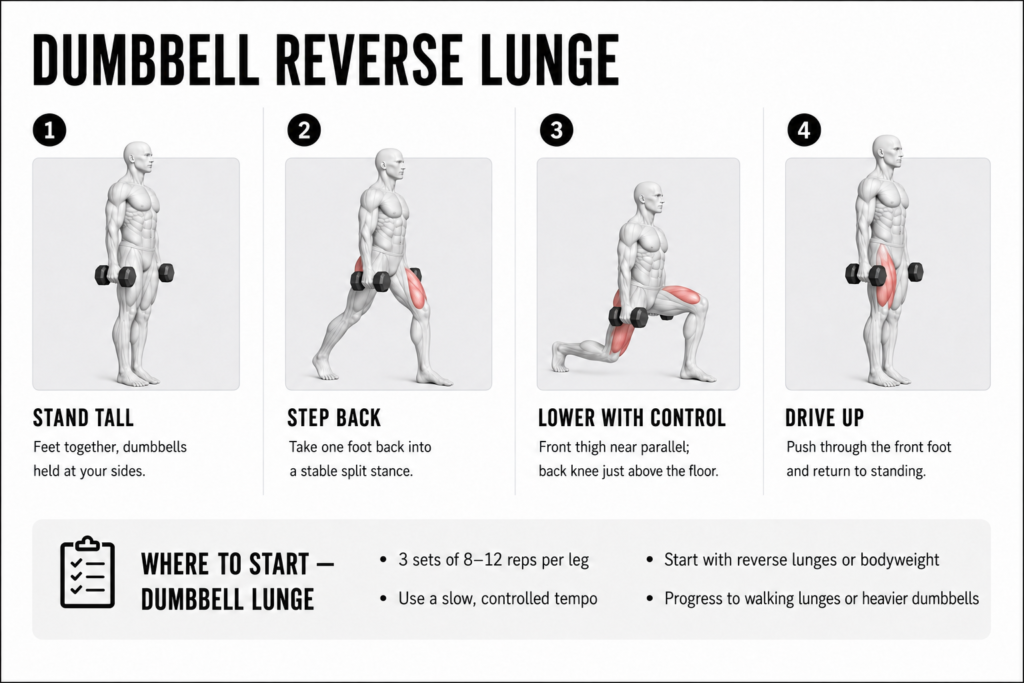
- Lower slowly and use the full range — a controlled descent to a back knee that nearly touches beats a fast, shallow rep every time
- Drive through the whole front foot, not the toes, so the glute and quad share the work
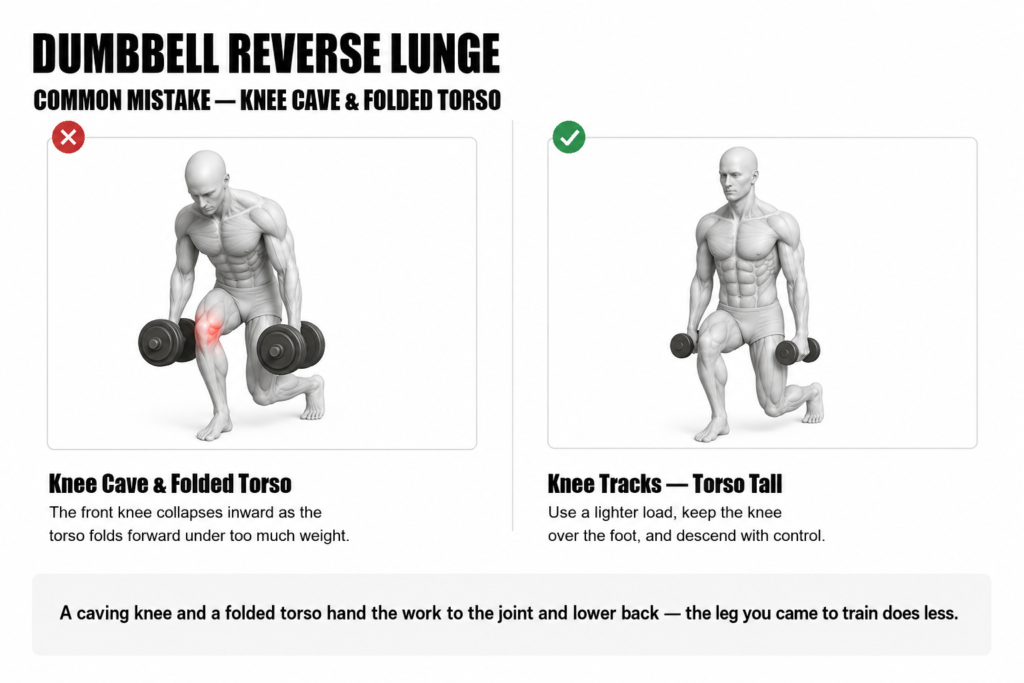
- Keep your torso tall with only a slight forward lean — folding forward hands the work to your lower back
Perfect Form
The lunge is simple to start and easy to do badly, because balance tempts you into shortcuts. These are the details that decide whether the working leg actually gets stronger.
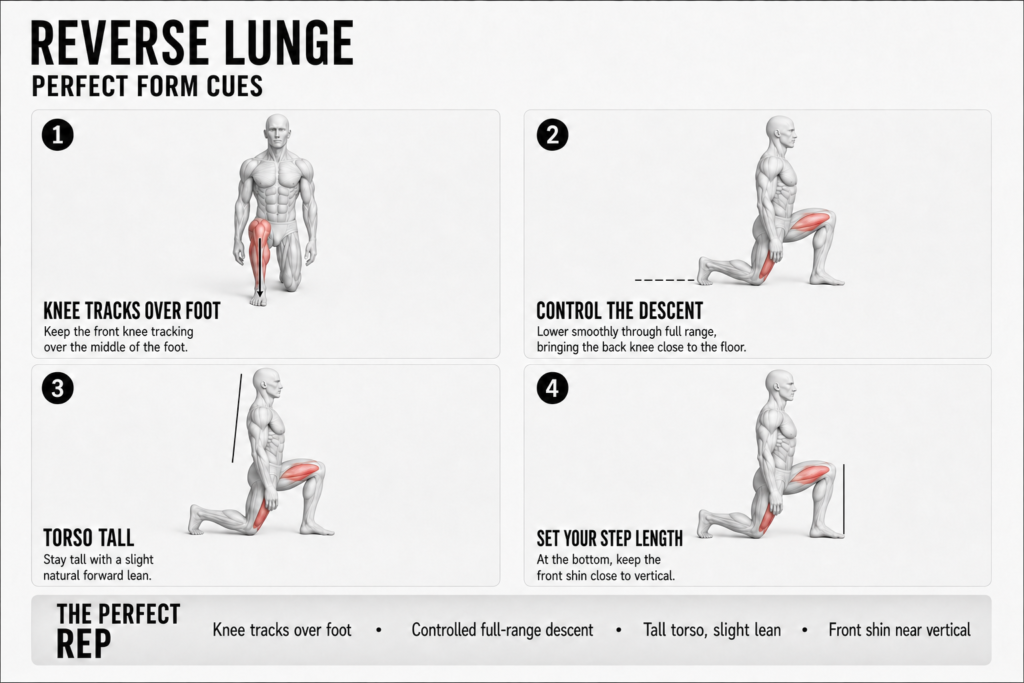
Track your front knee over the middle of your foot. The most common fault is the knee drifting inward as you lower. That’s usually the glute on the side of your hip switching off, and it robs the movement of its main benefit. Actively think about pushing the knee out in line with your toes on every rep.
Own the descent — don’t drop into it. Lowering slowly through the full range is where the strength and the joint-friendly feel come from; bouncing off the bottom skips the most useful part of the rep. Control down, pause, drive up.
Keep your torso tall. A slight forward lean is natural; folding at the waist is not. If your chest is dropping toward your knee, the load has shifted to your back instead of your leg.
Get the step length right. Too short and your front knee shoots past your toes into an all-quad grind; too long and you can’t reach depth. Aim for a stance where the front shin stays close to vertical at the bottom.
Get the descent under control first — almost every other fault fixes itself once you stop rushing the way down.
What You Should Feel
The front leg should feel it most — the quad and glute loading as you lower and driving as you stand. You’ll feel a stretch through the front of the back leg’s hip too, which is normal. Done with a full, controlled range, the movement should feel good on the knees rather than sharp or pinchy; if it’s pinching, check your step length and slow the descent down.
Expect one side to feel noticeably harder, wobblier, or weaker than the other the first few times. That isn’t a flaw in your technique — it’s the imbalance your two-legged lifts have been hiding, finally showing itself. It’s the whole reason the exercise is worth doing.
The clearest sign you’ve done it well shows up later — your glutes and hamstrings letting you know the next day. If you finish a set and felt it only in your knee or only in your quad, with nothing in the glute, your step was probably too short or your torso too upright.
Muscles Worked
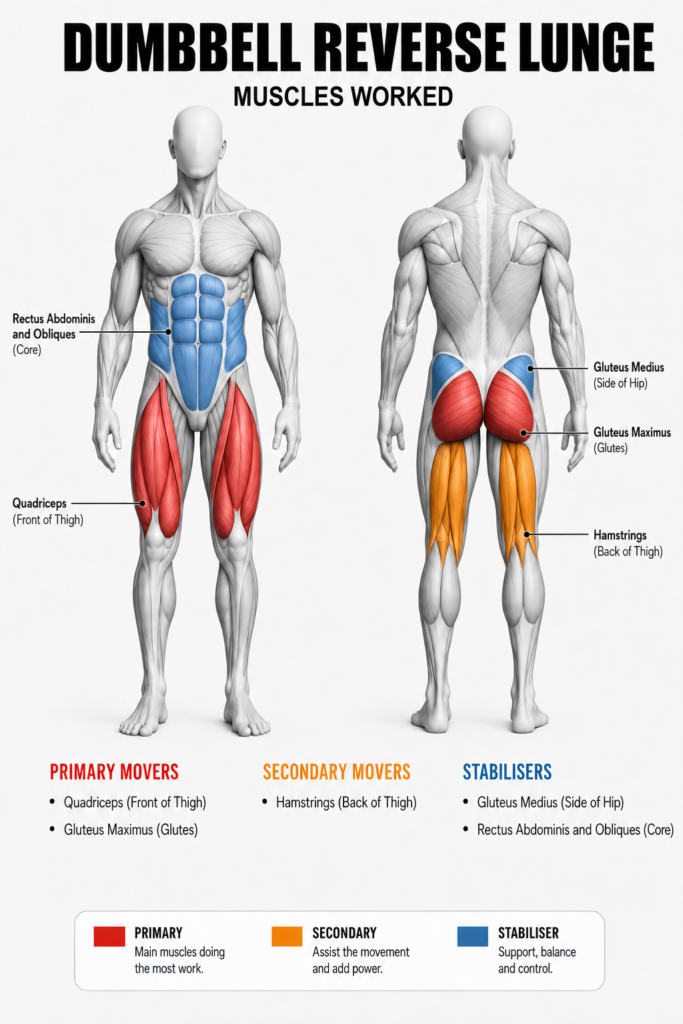
The prime movers are your quads (quadriceps) and glutes (gluteus maximus). The quads straighten the front knee to stand you up; the glutes drive the hip through and are worked especially hard by the deep, single-leg position — which is why lunges have a reputation as one of the best dumbbell movements for building the glutes. Your hamstrings assist through the drive and help control the descent.
The quieter story is the stabilisers. Because you’re balanced on one leg, the glute medius — the muscle on the side of your hip — works constantly to stop your knee caving inward, and your core braces to keep your torso tall. These are the muscles a two-legged squat lets you under-use, and training them directly is what carries over to steadier, more balanced movement everywhere else.
Common Mistakes
Letting your stronger leg set the standard
It’s easy to do honest, controlled reps on your good side and scrappy, half-balanced ones on the weak side — which cements the exact imbalance the lunge exists to fix. Start every set with your weaker leg, and match your stronger leg to what the weaker one can do well, not the other way round.
Adding weight before you’ve earned the balance
Loading up while you’re still wobbling turns the set into a fight to stay upright, and the stabilising muscles you’re trying to build get skipped in favour of just surviving the rep. Stay at a weight — or bodyweight — where every rep looks the same, then add load once it does.
Benefits & Why It Transfers
The direct payoff is single-leg strength and a real dose of glute and hamstring work from nothing more than a pair of dumbbells. But the bigger win is what it fixes: by forcing each side to work alone, the lunge exposes and closes the left-to-right gap your barbell squat and deadlift quietly hide — and a more balanced athlete is a stronger, more durable one under the bar.
Outside the gym it’s the most transferable pattern there is. Every step, every stair, every time you push up off one leg is a lunge in miniature — so training it directly shows up as legs that feel lighter on the walk home and steadier on uneven ground.
How To Programme It & Where It Fits
Three sets of 8 to 12 reps per leg, controlled, is the working range — start with reverse lunges and progress to walking lunges or heavier dumbbells as your balance holds. Keep the reps identical side to side; the set is only as good as your weaker leg’s cleanest rep.
As an accessory, lunges slot in after your main lift on a lower-body day — and there’s a smart order to it: do them before your isolation work, so they prime the muscles that isolation then targets. As a standalone, they’re a complete lower-body builder for anyone not yet under a barbell. When you’re ready to push further, the Bulgarian split squat is the natural next step, the barbell back squat is the bilateral lift this balances out, and the hamstring curl is the isolation move lunges prime best.
Dumbbell Lunge FAQs
Forward or reverse lunge — which should I do?
Start with reverse lunges. Stepping backward keeps your front shin more upright and puts less braking stress on the front knee, which makes the movement easier to control and gentler on the joint while you learn it. Once the pattern is solid and you can lower slowly through a full range, forward and walking lunges are worth adding for variety and extra balance demand.
Why is one leg so much weaker on lunges?
Because it always was — your two-legged lifts just let the stronger side compensate, so you never noticed. Single-leg work removes that option and shows you the gap directly. It’s normal and it’s the point. Train the weaker side first each set and match the stronger side to it, and the difference narrows over time.
Join The Conversation
The first time most people lunge, one leg feels like it belongs to someone else. Which side is your weaker one — and has the gap started to close since you began training each leg on its own? Drop a comment and let me know.