Important: I am not a physiotherapist or medical professional. Everything in this post is based on my own personal experience recovering from sciatica. Sciatica has multiple causes and what worked for me may not work for you — in some cases the wrong movements could aggravate your symptoms. Please consult a medical professional before starting any rehabilitation programme. Use this as a reference point, not a prescription.
The Situation
I hurt my back badly during a squat. What followed was almost two years of sciatica — constant pain at work, standing for long periods became unbearable, depression set in, my mobility deteriorated. I was traveling as a chef at the time, working to pay my bills, with no support network and no money to take months off for professional rehabilitation. I had to figure it out alone while continuing to show up every day.
I refused to rely on painkillers without addressing the root cause. So I researched, experimented, paid close attention to what helped and what didn’t, and slowly built my own rehabilitation menu. This post is the result of that process — what I did, why I did it, and how it progressed from barely being able to stand to training heavier than I ever had before the injury.
If you’re in a similar position — in pain, can’t afford to stop, don’t know where to begin — this post is for you.
The Principle That Guided Everything
Most advice for sciatica focuses on rest, stretching, and pain management. That wasn’t enough for me and it isn’t a long term solution for most people. The approach that actually worked was this:
Build strength around the spine rather than treat the spine itself.
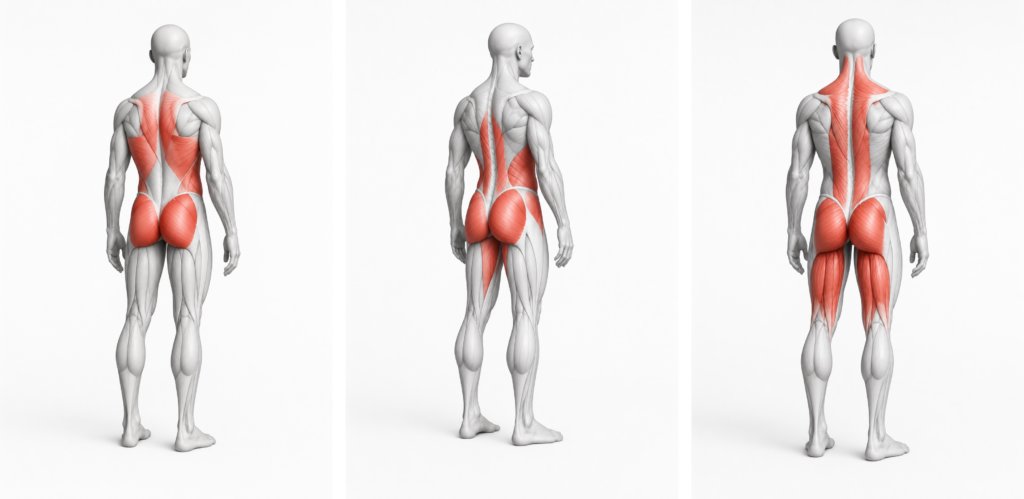
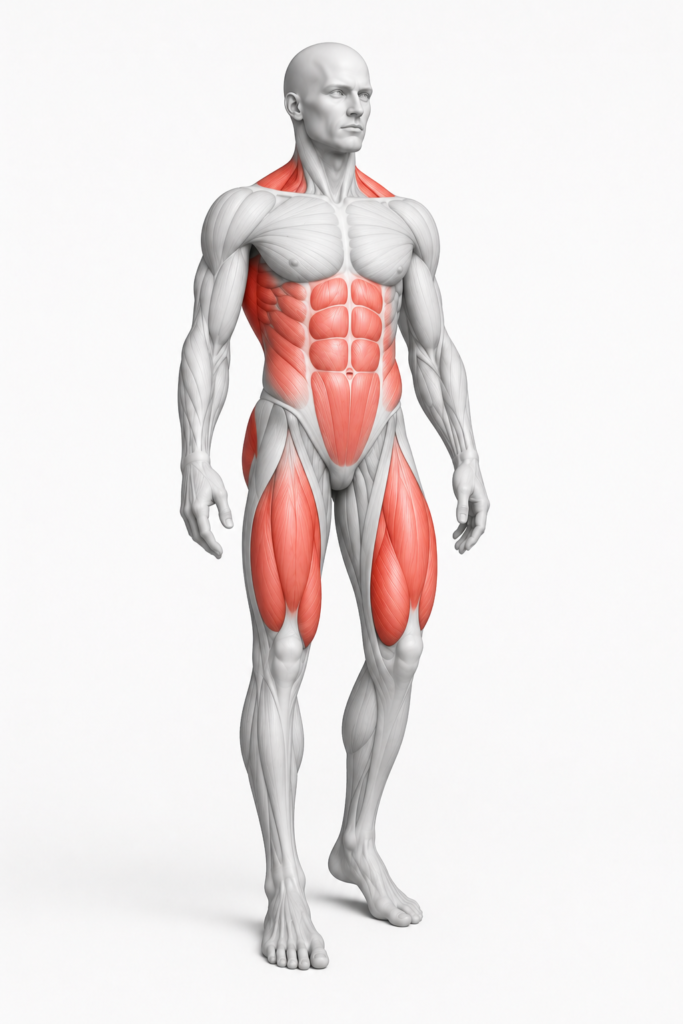
The spine needs support from everything surrounding it — glutes, hamstrings, hip flexors, core, erectors. When those structures are weak or inactive, the spine takes on load it shouldn’t be carrying. Sciatica is often the result of that imbalance. The goal was never to fix my spine directly — it was to make everything around it strong enough to do its job properly.
Every phase of my recovery followed that principle. The exercises changed as I got stronger. The logic stayed the same throughout.
Phase 1 — Finding What Didn’t Hurt
The first challenge was finding movement that didn’t aggravate the pain. Not exercises that fixed anything — just movement I could do without making things worse. This was about staying active, maintaining circulation, and beginning to activate the muscles that had switched off around the injury.
The Phase 1 menu:
- Backwards treadmill walking — this produced a significant and almost immediate reduction in pain during and after sessions. Lingering pain was relieved and a percentage of mobility returned after each session. The backwards motion loads the glutes and hamstrings differently to forward walking and takes pressure off the lumbar spine.
- Glute bridges — simple, low load, safe. Activating the glutes without putting any demand on the spine.
- Side planks — lateral core stability without compressing the lumbar spine.
- Seated cable rows — upper and mid back engagement. Improving posture and bracing capacity indirectly helped unload the lower back.
- Stair master — single leg glute and hip work with low spinal load. Kept me moving without aggravating symptoms.
- Gentle mobility work — piriformis and glute stretches, hip flexor stretches, 90/90 hip mobility, foam rolling through the glutes, hamstrings, and hip flexors.
The goal here was not strength. It was finding a pain window — a range of movement and load where the body could work without shutting down. Every session I paid attention to what felt better and what didn’t. That attention was the most important tool I had.
Phase 2 — Building Strength Around the Problem
Once I had established movements I could do consistently without flare ups, the focus shifted to building real strength in the structures surrounding the spine. This is where the rehabilitation actually happened.
The Phase 2 menu:
- Glute drives and hip thrusts — loading the glutes and posterior chain more heavily than glute bridges allowed. This became a cornerstone of the rebuild.
- Bulgarian split squats and lunges — unilateral leg work that built hip and glute strength without the bilateral spinal load of a squat. The elevated Smith machine split squat produced a particularly strong feeling through the hips and glutes.
- Copenhagen planks — progressed from side planks, these added adductor and hip stability that supported the whole pelvis.
- Band clamshells — hip abductor activation, small but important for hip stability and taking load off the lower back.
- Core bracing work — planks and deliberate bracing practice. Learning to create intra-abdominal pressure properly.
- Kettlebell erector drill — not an orthodox exercise. Rather than allowing the weight to pull sideways and work the obliques, I leaned slightly back, held my lower back to feel the erectors engaging, and used the kettlebell to create a stabilisation demand on the spinal erectors specifically. I found this through experimentation — it’s not a named exercise but the intent was to directly strengthen the muscles running either side of the lower spine.
- Hamstring stretches — keeping the posterior chain mobile while building strength through it.
This phase was the longest and the most important. Progress was slow and non-linear. There were setbacks — I pushed too soon once and flared it up. But I knew I was moving in the right direction because the markers were improving. I could stand for longer. I could extend my leg further without sharp pain. Each small improvement was data.
Phase 3 — Rebuilding the Posterior Chain
With a base of glute, hip, and core strength established, the focus moved to the posterior chain more broadly — hamstrings, erectors, and the hip hinge pattern that sciatica had made almost impossible.
The Phase 3 menu:
- Romanian deadlifts — this was the final piece. The RDL rebuilt the hip hinge pattern under load and was the movement that took me from managing the injury to being 99% recovered. The hamstring loading, the hip hinge mechanics, the spinal position required — all of it demanded and developed exactly what the recovery needed.
- Hamstring curls — direct hamstring strengthening to support the RDL pattern.
- Back extensions and GHD work — direct erector strengthening. The muscles running along the lower spine needed their own dedicated work.
- Farmer carries — full body bracing and stability under load.
By the end of this phase I could squat again. I could round my back without limitation. The things that had been impossible for two years were available again.
Phase 4 — Return to Full Training
The final phase was reintroducing the movements that had either caused the injury or been impossible during recovery. This required patience and honesty — starting lighter than felt necessary, paying close attention to any signals from the body, and building slowly rather than trying to recover lost ground quickly.
Squats came back cautiously. Deadlifts were rebuilt from scratch with proper technique. Full range of motion was restored gradually. The strength built during rehabilitation carried over — in many ways I came back stronger and more technically sound than before the injury because I had spent two years understanding how my body actually works.
Movements I avoided throughout — hack squats and leg extensions provoked symptoms and were left out entirely until full recovery was established.
What This Actually Taught Me
The recovery wasn’t linear and it wasn’t fast. There was no single breakthrough moment and no magic exercise. It was a cumulative process where every phase built on the last — and every phase mattered equally.
The backwards treadmill walking mattered. The glute bridges mattered. The split squats mattered. The RDLs mattered. Remove any one phase and the recovery would have been incomplete.
If you are where I was — in pain, working through it, figuring it out alone — the most important things I can tell you are these. Pay close attention to what helps and what doesn’t. Track every small improvement because those small improvements are the path. Don’t rush phases. And understand that the goal is not to manage pain — it is to build the strength that makes the pain irrelevant.
We are more resilient and capable of healing than we normally think when we’re at our lowest point. When you’re in that place it feels impossible. But with patience, consistency, and attention to each small step of progress, you will begin to see your path. Those small victories aren’t minor — they’re the illumination of the bigger picture.
A Final Note
If you can access professional help, do it. A good physiotherapist will assess the specific cause of your sciatica and build a programme around your anatomy and situation. Everything in this post is anecdotal — it worked for me, it may not work for you, and some of it could be wrong for your specific condition.
What I hope this post gives you is not a prescription but a framework — a way of thinking about rehabilitation that puts strength building at the centre and gives you a starting point when you have nothing else to work from.
Where This Fits
Recovering from sciatica didn’t just give me my body back — it gave me the foundation that everything on this site is built on. The glute bridge, the Romanian deadlift, the side plank, the split squat — these aren’t random beginner exercises. They’re the movements that rebuilt me, and they’re on this site because I know from experience exactly what they develop and why they matter.
If you’re working through this rehabilitation menu and want to understand each movement in more depth, the exercise posts are there when you’re ready. The glute bridge and the Romanian deadlift are the two I’d point to first — they sit at the heart of what fixed me and both posts go into the detail and technique that this post doesn’t.
Recovery doesn’t happen in isolation either. What you eat while you’re rebuilding matters — your muscles need the right fuel to repair and adapt. Eating to support recovery covers that without overcomplicating it. And if you’re thinking about how to structure your movement around the rehabilitation phases, how to structure your workouts as a beginner gives you a framework that adapts to wherever you’re starting from.
The bigger picture is simple. Injury is not the end of training. In many cases it’s where real training begins — because it forces you to understand your body in a way that chasing numbers never does.
Join The Conversation
If you’re dealing with sciatica or recovering from a back injury I’d genuinely like to hear how you’re approaching it. What movements have helped you? What made things worse? And if you’re at the start of the process and don’t know where to begin — drop a comment below. You’re not the only one who has been there and figured it out alone.