The seated cable row is one of the first pulling exercises most beginners encounter, and it’s also one of the most misunderstood. Most people assume it’s a movement for the arms and shoulders—when the real strength comes from the back. The cable machine is actually one of the best places to learn pulling safely, because the path of the movement is fixed for you.
The beginner problem usually shows up in two ways. Either you pull with your arms first—which kills your form and trains the wrong muscles—or you lean backward to muscle the weight, turning the row into a momentum exercise instead of a back-focused one. The cable row is supposed to teach you the opposite: how to initiate the pull from your back, not your hands.
This guide will walk you through how to set up, how to sequence the pull (back first, arms second), and how to recognize what a good row should feel like in your lats and mid-back. Then it will show you how to progress from the cable machine to free-weight rowing when you’re ready.
Rowing is a staple in any beginner routine, so learning it well here pays off for everything that comes after. If you haven’t already, take a few minutes to read how to structure your workouts as a beginner so you understand where this movement fits in your week.
What Is This Exercise?
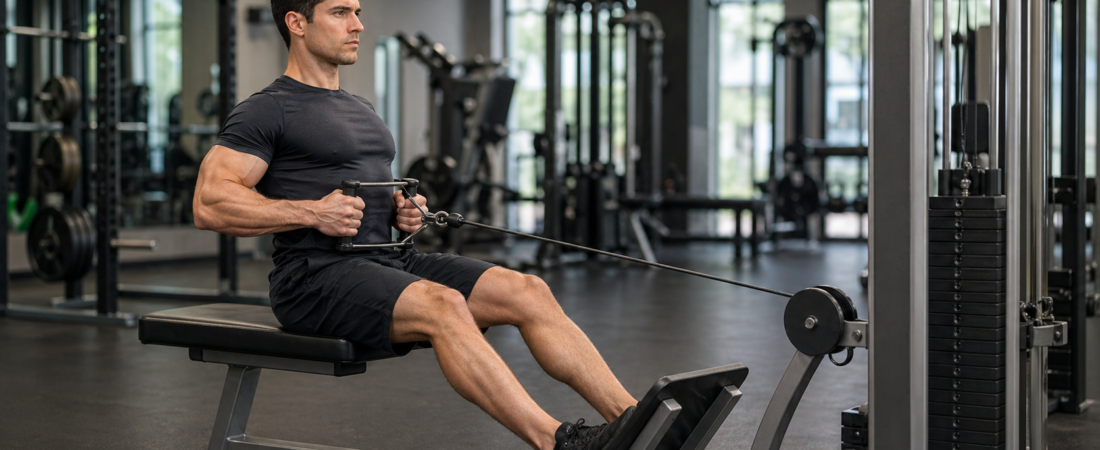
A seated cable row is a horizontal pulling exercise where you sit at a cable machine and pull a handle toward your lower chest or abdomen. It trains the back, biceps, and rear shoulders — the pulling muscles that support posture and balance out pressing movements.
What you need: A cable row machine (or a dumbbell for the at-home progression).
This is a horizontal pull movement — you pull weight toward your chest, the same motion you use pulling a heavy drawer open.
Seated Cable Row
Sets & Reps
- Sets: 3
- Reps: 8–12 per set
- Rest: 60–90 seconds between sets
How To Do It
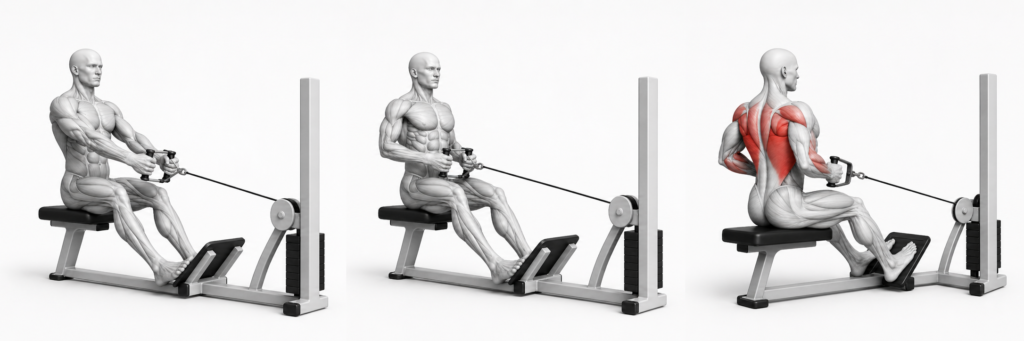
Sit upright on the bench with your feet planted firmly on the foot platform, chest tall, and shoulders relaxed away from your ears. Grip the handle with a neutral grip if your machine allows it (palms facing each other), or overhand if that’s the only option. Extend your arms fully toward the cable without locking your elbows or letting your shoulders round forward.
If you can complete all reps with control and feel it clearly in your mid-back and lats, you’re ready to add weight or move toward the dumbbell progression. If you’re struggling to feel your back engage, drop the weight and focus on the mind-muscle connection for another session or two before pushing the load.
Key Points To Pay Attention To
- Initiate the pull by driving your elbows backward—not by bending your arms first.
- Keep your chest up and shoulders packed down throughout; don’t round your spine between reps.
- Bring the handle to your lower chest or upper abdomen—don’t haul it all the way into your body.
- Maintain a neutral spine; resist the urge to lean back at the end of the pull for extra range.
- Control the return for 2–3 seconds, feeling your lats lengthen without slouching.
- Your hips and feet should stay quiet. If you’re moving around in the seat, the weight is too heavy.
What You Should Feel
- Tension across your mid-back, shoulder blades, and lats—this is the main event.
- A mild squeeze between your shoulder blades at the end of each pull, but never sharp pain.
- Your arms working, but secondary—they should feel like they’re along for the ride.
- Your core engaging to stabilize your torso, especially with heavier loads.
- A good stretch through your lats as you return to the extended position.
If you feel the pull mostly in your biceps or shoulders, drop the weight, take a breath before each rep, and cue yourself to “pull elbows back” instead of “pull hands toward you.” That small mental shift rewires the pattern.
Who This Is For
- Absolute beginners who need a stable, machine-based introduction to pulling strength.
- Anyone returning to training after time off and rebuilding pulling mechanics safely.
- Lifters who find free-weight rows intimidating or who lack the core strength to stabilize a bent-over position yet.
- People building a balanced routine who need an accessible back exercise.
Why This Movement Matters
The seated cable row is one of the clearest ways to learn what pulling should feel like. Because the cable fixes your path and removes the need to balance a free weight, your brain can focus on one thing: pulling with your back instead of your arms. Once that pattern is locked in, you can transfer it to harder variations. Without this foundation, free-weight rowing often becomes an arm exercise disguised as a back exercise.
Pulling strength is also non-negotiable for balance. If you only push (chest, shoulders, triceps), your shoulders roll forward and your posture suffers. Rows pull your shoulders back and build the upper-back density that makes you more resilient over time.
The cable row gives you something else, too—immediate feedback. You feel the muscle work right away, and you know quickly whether you’re pulling right or pulling wrong. That clarity builds confidence and makes progression feel less like guesswork.
A proper seated cable row teaches your back to lead the pull, which is the cornerstone of all rowing strength.
Dumbbell Row
Sets & Reps
- Sets: 3
- Reps: 8–12 per arm per set (or 6–10 if using heavier weight)
- Rest: 60–90 seconds between sets
How To Do It
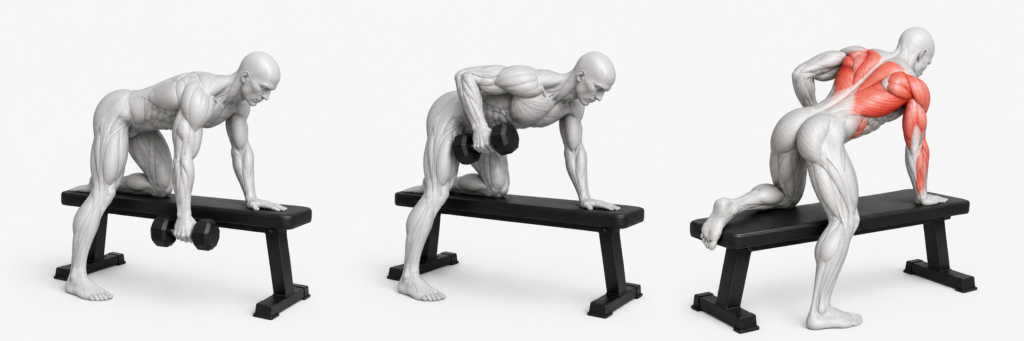
Stand with your feet hip-width apart, holding a dumbbell in one hand. Bend your knees slightly, hinge at the hips until your torso is nearly parallel to the ground (or about 45 degrees if you’re still building hip-hinge strength), and rest your free hand on a bench or sturdy surface for balance. Pull the dumbbell toward your hip, driving your elbow past the midline of your body, squeeze your lat at the top, then control the dumbbell back to arm’s length without letting your spine rotate.
You’re ready for dumbbell rows when you can complete 10+ strict cable rows with good form and hold a stable hip-hinge without collapsing. Start light and perfect the hinge before adding meaningful weight. One thing I do before picking up the dumbbell — I run through the arm path with no weight first. Just the motion, feeling the lat engage before any load is involved. It’s a simple way to wake up the right muscles before you challenge them.
Key Points To Pay Attention To
- The hinge matters first—hips back, chest proud, spine neutral. If your lower back rounds, stop and reset.
- Don’t let the dumbbell swing or drift forward; it should move in a straight line from arm’s length to your hip.
- Pull toward your hip, not your ribs or chest—this keeps tension on your lats instead of your upper traps.
- Your non-working shoulder stays packed down and doesn’t cave forward.
- At the top of the pull, your elbow should be behind your torso, not flared out wide.
- Control the lowering phase for 2–3 seconds; the dumbbell should not free-fall.
- Your hips and shoulders should stay level. If you’re rotating, the weight is too heavy.
What You Should Feel
- Strong lat activation on the working side from the first rep.
- A deep stretch through the lat as the dumbbell extends, followed by a controlled contraction as you pull.
- Your core and lower back working hard to stabilize the hinge—this is why dumbbell rows are harder than the cable version.
- Your posterior chain (lats, glutes, hamstrings, lower back) engaged because you’re supporting load in a bent-over position.
- Your working arm feeling like a hook—the back does the pulling, not the biceps.
If your lower back takes all the strain or your spine rounds, you’re hinging too deep or the weight is too heavy. Drop to a lighter weight or return to the cable row for another week until your hinge pattern solidifies.
Who This Is For
- Intermediate beginners who’ve mastered cable rows and want to add complexity.
- Lifters who want to train with free weights but need a safer entry than barbell rows.
- Anyone building unilateral strength to address side-to-side imbalances.
- People training at home or in a gym without cable machines.
Why This Movement Matters
The dumbbell row removes the cable machine’s assistance. Now you have to stabilize the dumbbell’s path yourself, balance your torso against its weight, and manage the extra demands on your core and lower back. The cable row prepared your back to pull—the dumbbell row teaches your whole body to coordinate under load.
It also lets you train one side at a time, which is powerful for catching imbalances. If one side is weaker, you’ll feel it immediately. That feedback loop is how you build even, symmetrical strength. And because dumbbells demand more stabilization, they naturally build core resilience that carries into everything else you do.
Once you’re solid on dumbbell rows, barbell rows and more advanced pulling patterns become much more accessible. You’re no longer learning the pattern and managing load at the same time—you’re just adding load to a pattern your body already knows.
The dumbbell row builds the stability and unilateral strength that makes you genuinely strong, not just strong in a machine.
Where This Fits
Rowing is one half of upper-body training. If your program is balanced, every pushing movement should be matched by a pulling movement, and the seated cable row is one of the simplest, most reliable ways to start checking that box. It teaches the pattern without overwhelming you.
Band rows and inverted rows are the entry point into this pattern — bodyweight only, fully self-regulated by adjusting your body angle. The seated cable row picks up once that bodyweight version stops being enough, adding fixed, adjustable resistance to the same horizontal pull.
The progression from cable row to dumbbell row mirrors how good training works in general—master the simpler version, build the foundation, then add complexity. Skipping that order is where most beginners stall or get hurt. Once these two rows feel natural, you’ll have the back strength and pulling mechanics to handle almost any future program with confidence. From here, band-assisted pull-ups become a realistic next step—same pulling muscles, different angle, bigger challenge.
It’s also worth knowing that back training doesn’t happen in isolation. The work you put in on rows and pulls only sticks if you’re giving your body what it needs to actually rebuild. Eating to support recovery is part of the process, not a bonus step.
If you want to see how all of this connects—the training, the food, the consistency—The 3 Pillars of Fitness is the clearest place to start. It’s the framework everything else here is built on.
Join the Conversation
I’d love to hear how this is going for you. Drop a comment and let me know:
- Which row variation are you starting with—cable or dumbbell?
- Where do you feel the pull most: lats, mid-back, or arms?
- What’s the hardest part of getting your back to lead the movement?
Your answers help me write better guides for beginners working through the same questions.