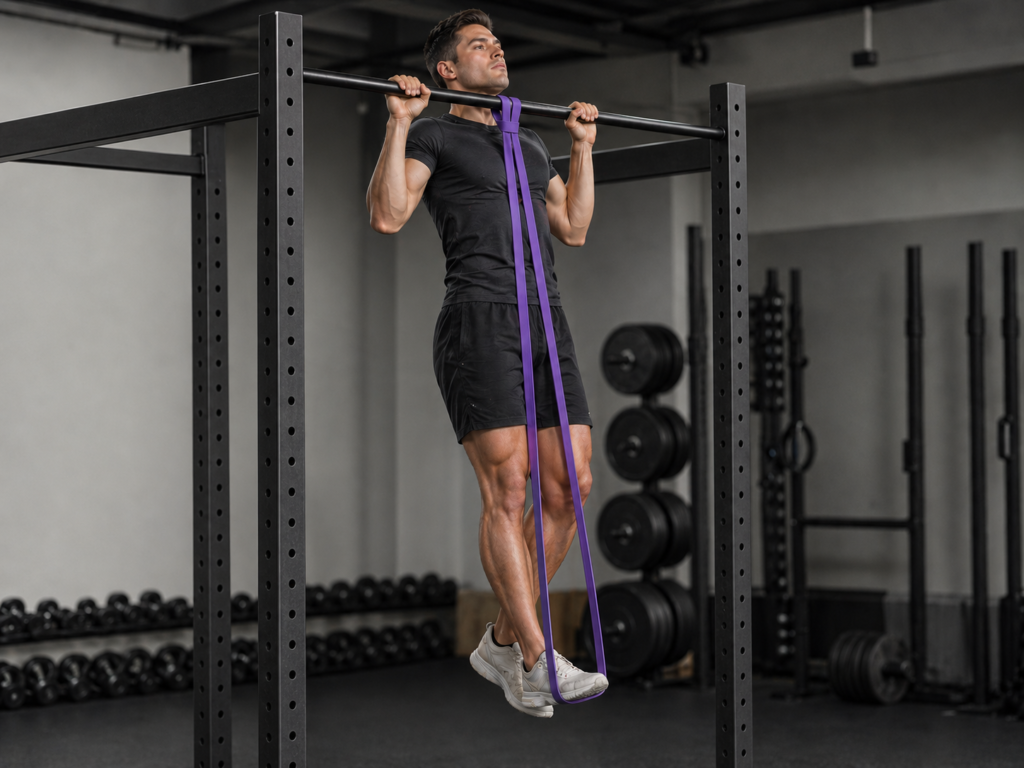
A pull-up is one of the most honest strength exercises you can do. Your body weight, gravity, and the bar — that’s it. But that simplicity is why many beginners either avoid pull-ups altogether or jump to machines that don’t teach the same pattern. Band assisted pull-ups sit in the middle: they let you build real pulling strength while the band reduces the load enough to practice good form.
The biggest mistake beginners make with band assisted pull-ups is not using them at all. Some people see bands as a shortcut or a sign they’re not ready. The reality is different — bands are a legitimate training tool that lets your body learn the right pattern at a weight you can actually control. Without that control, you end up compensating with your shoulders or lower back, which builds poor habits instead of strength.
This guide walks you through how to set up band assisted pull-ups correctly, what proper form should feel like, and exactly how to progress until you can do unassisted pull-ups. You’ll also learn common setup mistakes and how to recognize when you’re ready to drop to a lighter band or remove it altogether.
Band assisted pull-ups are a pulling movement, and pulling is a foundational pattern that should appear regularly in your training. If you’re still figuring out how often to train and what movements to prioritize, read our guide to how to structure your workouts as a beginner — it’ll help you see where pulling fits into the bigger picture.
What Is This Exercise?
A band assisted pull-up is a vertical pulling exercise where you use a resistance band looped over a bar to reduce the amount of bodyweight you lift. You hang from the bar, place a foot or knee in the band, and pull your body upward until your chin clears the bar. It trains the back, biceps, and shoulders while building the strength needed for an unassisted pull-up.
What you need: A pull-up bar and a resistance band.
This is a vertical pull movement — you pull your body upward toward a fixed point above you, the same motion you use climbing a ladder.
Setting Up Your Band
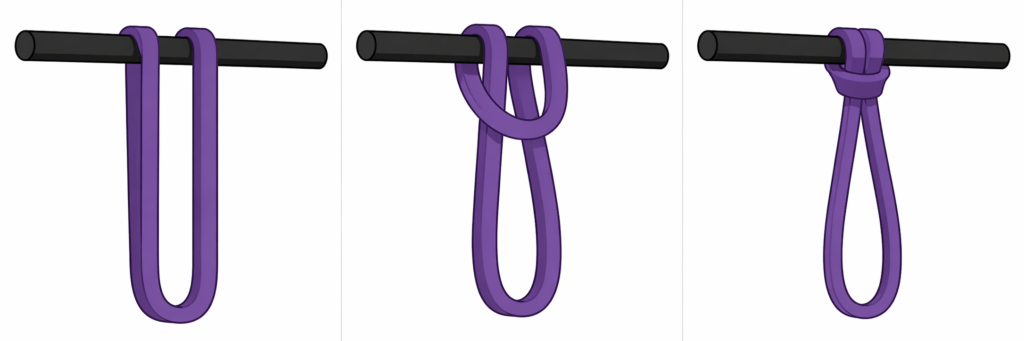
Before the first rep, attach your band to the bar using a larks-foot knot.
Drape the band over the bar, thread the bottom of the loop back through
itself, and pull it tight against the underside of the bar. Your band
is now secured and ready to hold your weight.
Band Assisted Pull-Ups
Sets & Reps
- Sets: 3–4
- Reps: 5–8 per set
- Rest: 60–90 seconds between sets
How To Do It
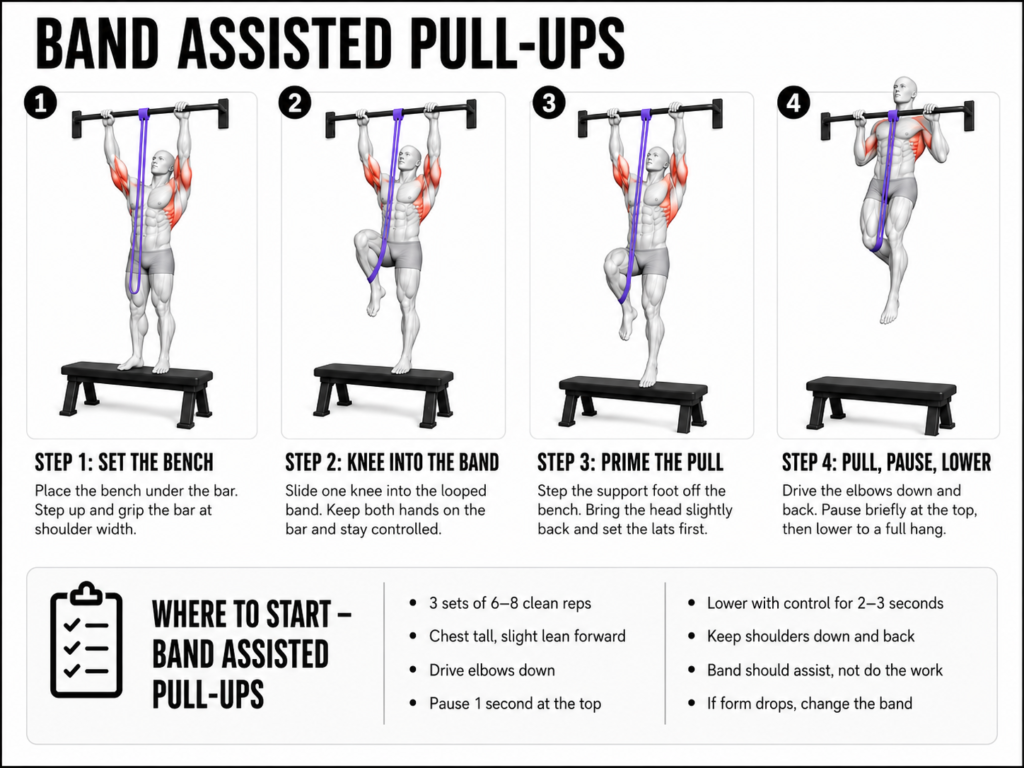
Place your bench directly beneath the pull-up bar so you can reach the hanging band comfortably. Step onto the bench, slide one knee into the bottom of the looped band, and grip the bar at shoulder width with both hands.
Once you’re set, step your supporting foot off the bench so your full weight is suspended — the band catches the weight of your knee and supports you as you hang. Before you pull, bring your head back slightly and push your lats forward — this primes your back to do the work before the rep even starts, instead of trying to switch it on halfway through the pull. Then pull your elbows down and back until your chest nearly reaches the bar, and control the descent back to a full hang.
Stay at this rep range and band weight until you can complete 8 reps cleanly on your last set without compensating with your shoulders. That’s your signal to move to a lighter band — not before.
Key Points To Pay Attention To
- Keep your chest upright and lean slightly forward if needed — avoid piking your hips or swinging your legs.
- Focus on driving your elbows down — not pulling with your arms. This cue is essential for engaging your back instead of your biceps.
- Pause for 1 second at the top with your chin above the bar — this teaches control and builds the strength you’ll need unassisted.
- The band should feel supportive, not like it’s doing the whole movement; you should still be working hard.
- Lower yourself with control (2–3 seconds) rather than dropping quickly; this builds strength in both directions.
- Your shoulders should feel pulled down and back, not shrugged up toward your ears.
- If the band feels too thick or thin, your rep quality suffers; change the band before changing the reps.
What You Should Feel
- Your lats (the large muscles on the sides of your back) working to pull your elbows down.
- A stretch through your shoulders and upper back at the bottom of the movement.
- Your core engaging to keep your body stable and prevent swinging.
- Your grip tightening as you pull, but not your forearms burning or dominating the effort.
- A sense of control and stability at the top, not a desperate struggle or easy coast.
Early on, it’s normal to feel mostly your arms and grip doing the work. The shift toward feeling your back actually drive the pull is something that builds up over weeks of reps — it’s not a sign you’re doing it wrong if it isn’t there from session one.
If your shoulders feel sore or tight instead of your back working — especially a discomfort between your shoulder blades or near the base of your neck — you’re likely pulling your elbows out to the sides instead of straight down. Reset your grip slightly wider and focus on the “elbows down” cue for the next set.
Who This Is For
- Beginners with little to no upper-body pulling experience.
- Anyone returning to training after time away.
- People who can hang from the bar but can’t do even one unassisted pull-up yet.
- Lifters who are strong but want to build the specific pulling pattern before adding weight.
Why This Movement Matters
Band assisted pull-ups teach your body the exact pattern of a full pull-up — elbows down, chest upright, controlled movement — without needing bodyweight strength you don’t yet have. This is crucial. If you skip the assisted version and try to jump straight to unassisted pull-ups or machines, you’ll either get nowhere or build bad habits. The band removes just enough load so you can practice the movement 5–8 times per set, which means your nervous system gets enough reps to actually learn the pattern.
Pulling is one of the four basic movement patterns every beginner should develop. Without regular pulling, your back and shoulders stay weak, your posture suffers, and your risk of injury goes up. Band assisted pull-ups are the most honest way to start — no machine, no cables, just you, a bar, and a band. That simplicity means you’re building real strength that carries over everywhere.
Many beginners underestimate how long the assisted version takes. Expecting to go from assisted to unassisted in a few weeks is unrealistic. Most people need 8–12 weeks of consistent band work before they can do even one full pull-up. That’s not a failing on your part — it’s how strength actually builds.
Band assisted pull-ups are not a shortcut — they are the foundation, and treating them seriously is how you build pulling strength that lasts.
Full Pull-Ups (Unassisted)
Sets & Reps
- Sets: 3–5
- Reps: 1–5 per set (quality over quantity at first)
- Rest: 90–120 seconds between sets
How To Do It
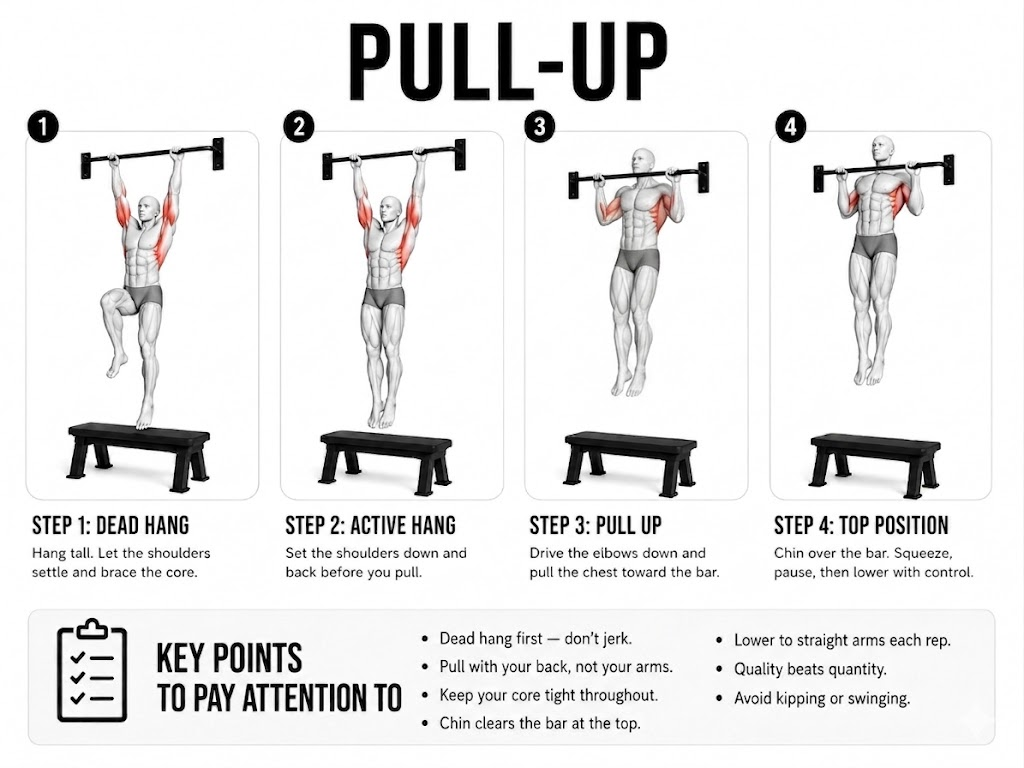
Start from a dead hang with straight arms and your grip at shoulder width. Before you pull, bring your head back slightly and push your lats forward to prime your back — the same setup that works on the band assisted version, now with no band taking the edge off. Then pull your elbows down and back until your chin clears the bar. Lower yourself with full control (3–4 seconds), stopping just before your elbows lock out to keep tension through the bottom.
Attempt full pull-ups when you can do 8 band-assisted reps with a light band (the thinnest available) and feel strong and controlled at the top. If that’s not you yet, stay with the band — the jump is earned, not rushed.
Key Points To Pay Attention To
- Dead hang first; let your shoulders settle before you pull — don’t jerk or use momentum.
- Pull with your back, not your arms; imagine pulling your elbows to your hips rather than your hands to the bar.
- Keep your core tight the entire time; a loose core causes swinging and wastes energy.
- Your chin should clear the bar at the top, but you don’t need to pull higher — that’s the standard and it’s enough.
- Lower all the way to straight arms (but not locked) to build strength through the full range.
- If you can only do 1–2 reps, that’s a success; more reps with bad form is worse than fewer reps done well.
- Avoid kipping, swinging, or using momentum; this is strength work, not gymnastics.
What You Should Feel
- Your back driving the movement, especially your lats and mid-back.
- Your shoulders pulled back and down, stable and controlled.
- Your arms working as secondary muscles, not the primary driver.
- Your grip engaged but not painfully; your forearms should be a small part of the effort.
- Deep engagement through your core, with your entire torso staying rigid and aligned.
The feeling of “my back is doing this, not my arms” usually arrives in stages, not all at once — first the grip and arms are what you notice, then a session where you catch your back joining in, then eventually the back becomes the obvious driver. If you’re still mostly feeling arms and grip after weeks of training, that’s a normal stage, not a stalled one.
If you can do band-assisted pull-ups but can’t do even one full pull-up, drop back to a lighter band and spend 2–3 more weeks building reps there — the jump from light-band to no-band is often bigger than it feels.
Who This Is For
- Lifters who have spent 8–12 weeks doing band-assisted pull-ups consistently.
- Anyone who can do 8+ band-assisted reps with a light band and wants to go unassisted.
- People looking to build a sustainable pull-up practice as part of their regular strength training.
- Beginners ready to commit to lower rep counts in exchange for real, unassisted strength.
Why This Movement Matters
An unassisted pull-up is a pure strength statement. No machine, no band, no external help — just you and your bodyweight. The moment you pull your chin above the bar without assistance, your nervous system has made a real jump in capability. Your back, shoulders, and arms are now strong enough to move your entire bodyweight through space. That carries over immediately into other pulling exercises, upper-body stability, and everyday tasks like climbing or pulling yourself up.
Full pull-ups build on everything you learned with the band. The pattern is identical, but now you’re pulling your full bodyweight. The volume might drop — from 8 band-assisted reps to 2–3 unassisted — and that’s normal. Lower reps with higher load is still building strength. Over weeks and months, the reps will climb.
Pull-ups are also one of the best ways to measure real progress. You can track it simply: how many can you do? No guessing, no machine settings, just a number that either goes up or it doesn’t.
Full pull-ups are the next level of the same pattern you’ve been practicing — not a different movement, just without the band.
Common Mistakes
Hips piking
The hips bend upward as you pull, putting your body into a V-shape instead of a straight line. This happens when the core switches off — the lower body disconnects from the movement and the hips rise to compensate. Keep the core tight from the moment you leave the bench. Your body should stay in one straight line from head to knee throughout every rep. If the hips pike consistently, reduce the band resistance so the core can hold the position without assistance.
Shoulders shrugging instead of pulling down
The shoulders rise toward the ears at the start of the pull instead of pulling down and away from them. This shifts the work into the neck and upper traps rather than the lats and mid-back — the muscles that are supposed to be driving the movement. Before you pull, actively set your shoulders down and back. That position should hold throughout the rep. If you feel the neck working hard or tension building at the top of the shoulders, the shrug is happening — reset and focus on the down-and-back cue before the next rep.
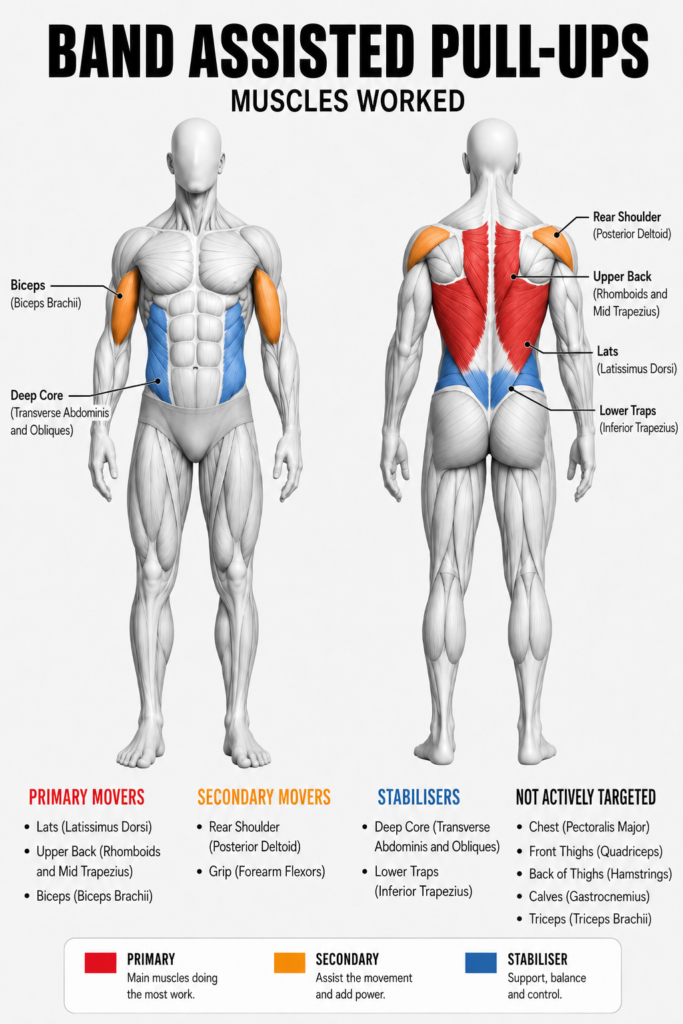
Muscles Worked
Primary Muscles:
- Lats (Latissimus Dorsi): The main driver of the pull — brings your elbows down and your body up toward the bar.
- Upper Back (Rhomboids & Mid Traps): Pull your shoulder blades back and stabilize the movement at the top.
- Biceps (Biceps Brachii): Assist in bending the arms as you pull yourself upward.
Secondary Muscles:
- Back of the Shoulders (Rear Delts): Help control the pull and support shoulder positioning.
- Forearms & Grip (Forearm Flexors): Keep you locked onto the bar — often the limiting factor early on.
- Core (Abdominals & Obliques): Keeps your body stable and prevents swinging or energy leaks.
- Lower Traps (Lower Trapezius): Help keep your shoulders pulled down (not shrugged), which is key for clean reps.
Band-Assisted Pull-Up FAQs
How do you attach a resistance band to a pull-up bar?
Use a larks-foot knot: drape the band over the bar, thread the bottom of the loop back through itself, and pull it tight against the underside of the bar. Then step up and place a foot or knee in the hanging loop.
Are band-assisted pull-ups worth doing?
Yes — the biggest mistake beginners make with them is not using them at all. The band reduces the load enough to let your body learn the right pattern at a weight you can actually control. Without that control, you end up compensating with the shoulders or lower back, which builds poor habits instead of strength.
How many band-assisted pull-ups should I do?
3–4 sets of 5–8 reps with 60–90 seconds rest between sets.
Where This Fits
Band assisted pull-ups and full pull-ups are part of the pulling pattern — one of the four fundamental movement patterns every beginner should develop regularly. Pulling strengthens your back, shoulders, and biceps while building the postural stability that protects your shoulders over time. If you’re doing squats and push-ups but no pulling, you’re building an imbalance that will eventually show up as shoulder issues. Band assisted pull-ups let you start building that pattern from day one, and full pull-ups let you progress it indefinitely.
The reason we focus on band assisted pull-ups first is the same reason we focus on planks before advanced core work or glute bridges before advanced lower-body exercises: control and pattern come before load and volume. Beginners often want to skip the assisted version and jump straight to the bar, then get frustrated when they can’t do a single rep. The band isn’t a shortcut — it’s the tool that makes consistent practice possible. And consistency, over weeks and months, is what actually builds the strength you need.
The band is a starting point, not a permanent fixture. As the band-assisted reps get easier and the band itself gets thinner, negative pull-ups are the next step — controlling the lowering phase under full bodyweight before you’re ready to control the entire rep, up and down, unassisted.
When you’re planning your weekly training, pulling movements should appear 2–3 times per week, balanced with your pushing and lower-body work. Vertical pulling like pull-ups pairs naturally with horizontal pulling like rows — if you haven’t added those yet, start with band rows and inverted rows to round out your pulling work. And once you’re training consistently, don’t overlook what happens between sessions — recovery is where the strength you’re building actually gets locked in. Pulling strength gets built in the context of a plan that balances all the basic patterns — and if you want to see how pulling fits alongside everything else, the three pillars of fitness is a good place to start.
Join The Conversation
Where are you with pull-ups right now — still working through the band assisted version or have you made it to unassisted? Drop a comment and say what’s happening. That’s usually enough to work out what’s holding things up.