I came to the deadlift the way most people do — I read that it was the king of compound movements and I wanted to get bigger without spending two hours in the gym. If it trained almost everything at once, it made sense to make it the centre of what I was doing. So I started pulling, and it worked. I got stronger, I got bigger, and I started to understand why serious lifters treat this lift differently to everything else.
What I didn’t understand at the start was that I was only doing half the lift. I was bracing, getting into a position that felt roughly right, and pulling. My upper back was taking on load it shouldn’t have been. My lower back was compensating. I was getting results in spite of my technique, not because of it. It took years of training — and eventually retraining the lift almost from scratch — before I understood what the deadlift actually demands from you.
The conventional deadlift is not complicated, but it is exacting. The difference between a pull that builds you up and one that grinds you down is rarely about how much weight is on the bar. It’s about tension, position, and sequence — and getting all three right before the bar leaves the floor. That’s what this guide is about.
If you’ve worked your way through the beginner and intermediate movements on this site, you’re ready for this. But come in with patience. The deadlift rewards people who take the time to build it properly, and it has a long memory for the ones who don’t.
What Is This Exercise?
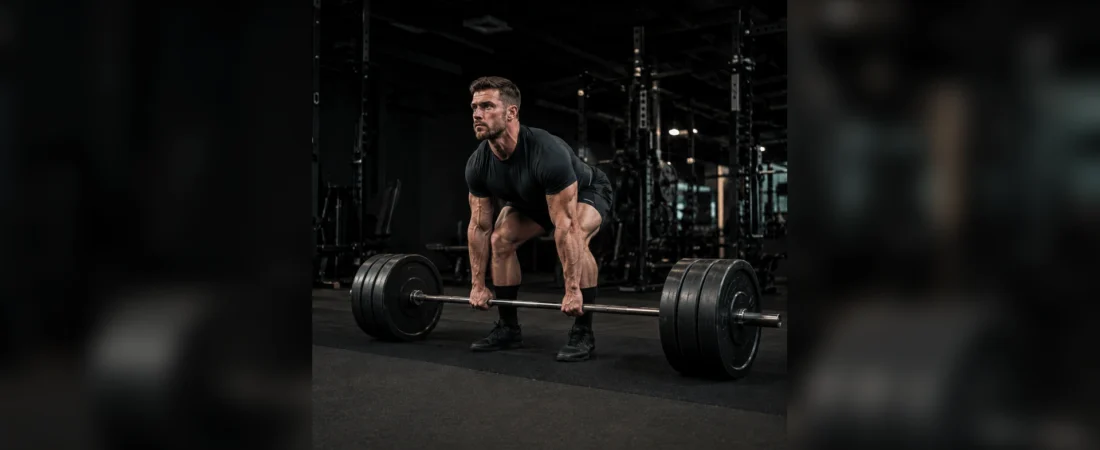
A conventional deadlift is a full-body pulling exercise where you lift a loaded barbell from the floor to a standing position. It trains the entire posterior chain — glutes, hamstrings, and lower back — along with the core and grip, making it one of the most complete strength movements available.
What you need: A barbell and weight plates.
This is a hinge movement — your hips bend backward while your knees stay mostly soft, the same motion you use bending down to pick something off the floor.
Who This Is For
This guide is written for someone who has put real time into the foundational movements — hip hinges, glute bridges, Romanian deadlifts — and is ready to take that pattern to its most demanding expression. You don’t need to be strong. You need to be ready to learn.
If you’re coming from the beginner tier on this site, you’ll already understand the hip hinge, how to brace, and what it means to feel the right muscles working. That foundation matters here more than anywhere else. The conventional deadlift will expose every weakness in your chain — grip, core, posterior strength, positional awareness — and it will do it honestly. There’s nowhere to hide under a loaded barbell.
This is also a guide for anyone who has deadlifted before but suspects they’ve been doing it on instinct rather than understanding. If you’ve been pulling decent weight but your lower back is always the thing that feels it most, this is for you. That’s not how the lift is supposed to feel.
Grip and Foot Position
Before you load the bar there are two things to get right that most people never think about — how your feet are set and how your hands are on the bar. Both affect everything above them.
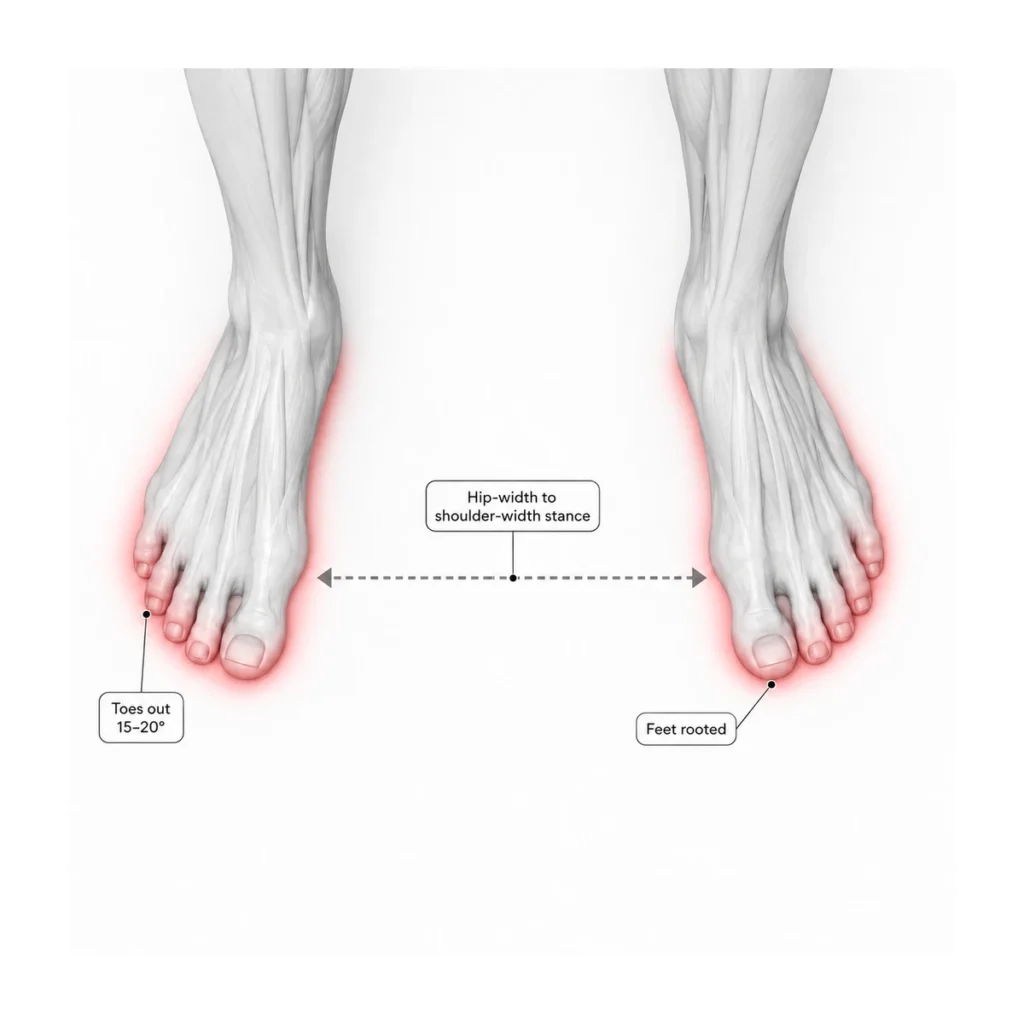
Feet: Hip to shoulder-width apart, toes turned out 15 to 20 degrees. That slight flare opens the hips and gives you the base you need to drive force into the floor. Set them once before you hinge down and don’t adjust between reps.
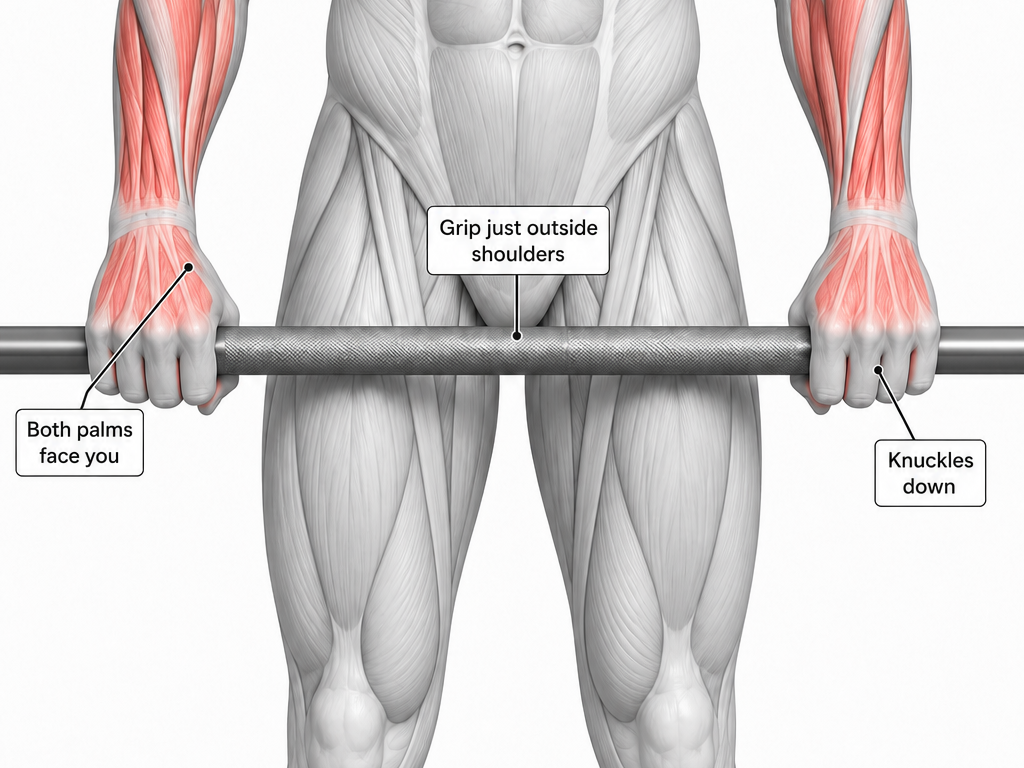
Double overhand grip: Both palms facing you, grip just outside your shins. Start here. It’s the hardest grip to hold under heavy load but it builds genuine grip strength and keeps you muscularly balanced across both sides.
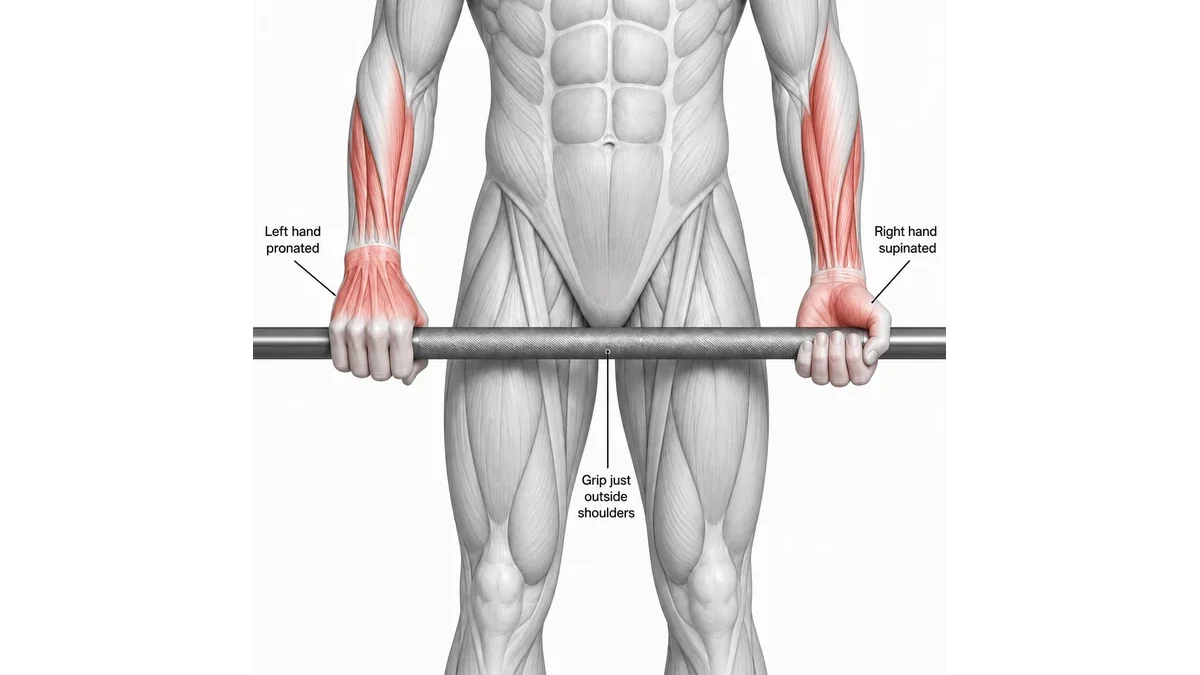
Mixed grip: One palm facing toward you, one facing away. Significantly stronger than double overhand and far less likely to slip as the weight increases. The supinated hand — the one facing away — takes more bicep stress, so alternate which hand faces which direction every session to avoid building an imbalance over time.
Sets & Reps
The deadlift is not a movement to load aggressively while you’re still learning it. Start light — lighter than feels necessary — and treat every rep as a technique rep.
When you’re learning the movement:
- 3 sets of 3–5 reps at a weight that lets you focus entirely on position
- Rest fully between sets — 2–3 minutes minimum
- If a rep feels wrong, stop the set and reset
When the pattern feels solid:
- 3–4 sets of 3–5 reps at 60–70% of your estimated max
- This is your technique and strength building range — don’t rush past it
When you’re ready to push:
- Work up to 80–90% for 2–3 reps on your heavier weeks
- Keep a lighter technique week in between — your nervous system needs it
One session per week is enough for most people, especially if you’re on your feet all day or have a physically demanding job. Recovery is part of the training. If you feel beaten up going into a session, go lighter. The deadlift rewards consistency over heroics.
The Checklist: Setup to Lockout
If you want the fast version before the full breakdown below, here it is.
Setup
- Bar over the middle of your foot
- Feet hip to shoulder-width apart, toes turned out slightly
- Shins close to the bar before you hinge down
- Grip just outside your shins
- Shoulder blades pulled down into your back pockets, not back
- Chest up, neutral spine
- Eyes on the floor a metre or two ahead of you
The Brace
- Big breath into your belly, not your chest
- Brace your core hard, like you’re about to take a punch
- Create pressure in every direction — front, sides, and back
- Hold that brace for the entire rep
The Pull
- Pull the slack out of the bar until it goes tight
- Wedge your shins to the bar by engaging your hamstrings and glutes
- Push the floor away — don’t just pull the bar up
- Keep the bar dragging against your legs the whole way
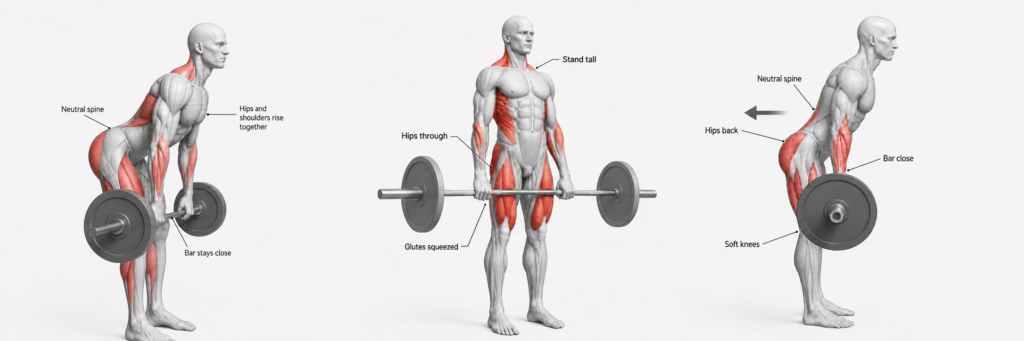
- Hips and shoulders rise at the same rate
- Drive your hips forward and squeeze your glutes hard at lockout
The Descent
- Push your hips back first
- Let the bar travel back down your thighs
- Bend your knees once the bar passes them
- Control the weight all the way to the floor
- Stay braced until the bar settles
- Reset completely before the next rep
That’s the checklist. If it feels right and the bar stays over your mid-foot, you’re in position — everything in The Detail below is the why behind each point, for whenever you’re ready to go deeper.
The Detail
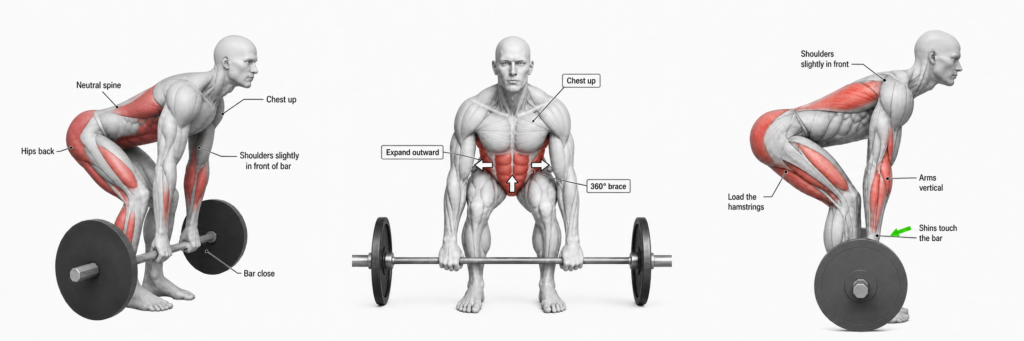
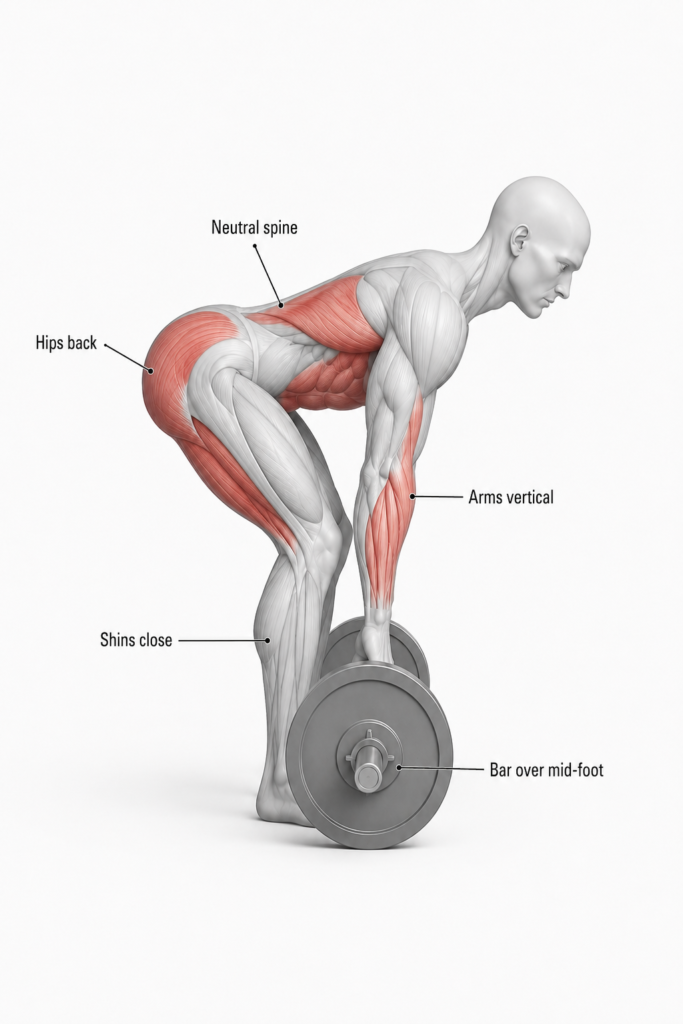
The setup is the lift. Get everything right before the bar moves and the pull becomes a natural consequence of good position. Stand with the bar over the middle of your foot — not your toes, not your heel, the midpoint of your whole foot. Your stance is probably narrower than you expect, hip to shoulder-width with a slight toe flare (around 15 degrees). Step in close, hinge at the hips, and grip just outside your shins. Once you’re gripped, pull your shoulder blades down into your back pockets — not back as you would on a bench press, but down. This engages your lats, locks the bar tight to your body, and sets you up for a straight bar path. Chest up, neutral spine, eyes on the floor a metre or two ahead of you.
Bracing is the most important thing you will do in this lift. More important than grip, more important than foot position. A missed brace under a heavy bar is how lower backs get hurt. The brace is not just sucking your stomach in — it’s creating full 360 degree pressure that stiffens your entire trunk and protects your spine under load. Take a deep breath into your belly so your stomach expands outward, then lock everything down hard as if someone is about to hit you in the midsection. Hold that pressure for the entire rep. A lot of people exhale at the hardest point of the lift — usually just past the floor or at the knee — and that’s exactly when your spine needs the most support. Breathe out only when the rep is complete and the bar is back on the floor. If you use a belt, the brace works exactly the same way — you’re bracing into something solid which gives you feedback, but the belt is not doing the work for you.
The pull doesn’t start when the bar leaves the floor — it starts the moment you take the slack out. On a loaded barbell there is give in the system between the plates, the bar, and the floor. Before you commit, apply tension by pulling upward gently until you feel everything go tight. You’ll sometimes hear a click as the plates seat. That’s your signal. As you create that tension your shins will angle forward toward the bar — this is the wedge. You’re not pushing the bar with your shins, you’re driving your hips into position while engaging your hamstrings and glutes, which brings your shins forward as a consequence. When it happens correctly you’ll feel a significant increase in tension through your entire posterior chain before the bar has moved an inch. Now drive. Push your feet through the floor rather than thinking about pulling the bar up. Keep the bar dragging against your legs the entire way — shins, past the knees, up the thighs. Hips and shoulders rise at the same rate. If your hips shoot up first your legs come out of the movement too early and the lift becomes a back exercise in the worst possible way. At the top, drive your hips forward and squeeze your glutes hard. Stand tall, chest up. That’s the lift.
The descent is where most people switch off. The lift is done and the instinct is to drop the bar and go again. Control it down instead. Push your hips back first, keep the bar close to your body, let it travel back down your thighs. Once it passes your knees bend them and lower it the rest of the way to the floor. Stay braced until the bar settles. Then breathe out, reset, and go again. Each rep should look identical to the one before it. A bar that’s been dropped and bounced is a bar you have to reposition before you can pull cleanly — and a sloppy descent almost always leads to a sloppy setup on the next rep.
A Note on the Central Nervous System
There’s something that happens with heavy deadlifting that most beginners aren’t prepared for and can’t easily explain when they first encounter it. You’ll come into a session feeling physically fine — no soreness, no obvious fatigue — but something feels off. Motivation is low, the bar feels heavier than it should, you’re just not there. The instinct is to reach for a pre-workout and push through it. Sometimes that works. Sometimes it’s the wrong call.
What you’re likely feeling is central nervous system fatigue. The CNS — your brain and spinal cord — is what sends the signals that tell your muscles to contract. When it’s fatigued the symptoms aren’t always physical — they show up as lack of motivation, poor mood, and a skewed perception of how hard you’re working. Your muscles might be recovered. Your CNS might not be. One of the leading causes is extending oneself during workouts, though poor sleep and nutrition play a significant role too.
The deadlift is particularly demanding in this regard because it recruits so much muscle mass and places such a high demand on the nervous system to coordinate everything simultaneously. Strength work performed above 80% of your max on lower body and whole body movements like deadlifts and squats is among the most CNS draining training you can do. That off feeling before a session is often your body signalling that it hasn’t fully recovered from the last one. You can override that signal — pre-workout exists partly for this reason — but if you’re new to heavy training, overriding it consistently is how you accumulate fatigue faster than you can recover from it.
The flip side is worth understanding too. The deadlift is one of the most powerful tools available for building a stronger, more resilient nervous system over time. The adaptation works both ways — the same stimulus that fatigues the CNS in the short term trains it to handle greater demands in the long term. This is a large part of why I keep coming back to the deadlift. Pulling heavy doesn’t just build muscle — it builds the neurological capacity to recruit more of what you already have. That carries over to everything else you do in the gym.
Listen to the signals. Train the lift consistently. Give your nervous system the recovery it needs and it will repay you with strength you didn’t have before.
Common Faults and How to Fix Them
The bar drifts forward off the floor This is the most common fault and it usually comes from the bar not being over mid-foot at setup, or from the lats not being engaged before the pull. When the bar drifts forward the moment arm increases and your lower back takes over immediately. Fix the setup first — bar over mid-foot, shoulder blades down, lats locked in. If it still drifts, slow down the first inch of the pull and think about dragging the bar back into your body as you drive.
Hips shooting up before the bar moves This turns the deadlift into a stiff leg pull where your lower back does most of the work. It usually happens because the hips are too low at setup — people squat the deadlift instead of hinging it — or because they’re trying to jerk the bar off the floor. Take the slack out slowly, wedge properly, and think about your hips and shoulders rising as one unit. If your hips are rising first your legs have already left the movement.
Lower back rounding under load Some upper back rounding is natural and not necessarily dangerous at advanced level, but lower back rounding is a different matter. It usually means one of three things — the weight is too heavy, the brace was missed, or you lack the posterior chain strength to hold position through the pull. Drop the weight, rebuild the brace, and spend more time on Romanian deadlifts and good mornings before coming back to heavier loads.
Grip failing before the set is done If your grip is the thing ending your sets rather than your legs or back, address it directly. Train double overhand longer than feels comfortable. Add farmer carries. Use chalk. Mixed grip is there when you need it but don’t reach for it too early — grip strength built without it carries over to everything else you do in the gym.
Losing tension at the top A lot of people get the bar off the floor well and then coast through the top half. The lockout requires active effort — drive the hips forward, squeeze the glutes hard, stand completely tall. If you’re hyperextending at the top you’ve gone too far. If you’re soft at the top you’ve left the rep unfinished. Lock out like you mean it every single time.
Programming
The deadlift is the most taxing movement you will do in the gym. It recruits more muscle mass than anything else and it hits your nervous system hard. One session per week is enough for most people, and that session deserves to be treated as the centrepiece of your training week rather than something you fit in around everything else.
The approach that has worked best for me is alternating intensity across weeks rather than trying to go heavy every session.
Week one — technique and volume
- 4 sets of 3–5 reps at 60–70% of your estimated max
- Focus is entirely on position, sequence and consistency
- Every rep should look identical
Week two — working weight
- 3–4 sets of 2–3 reps at 80–90% of your estimated max
- This is where you push — but only if week one felt clean
- If something felt off in week one, repeat it before moving here
Every third or fourth week — deload
- Drop back to 60–70% and focus purely on technique
- This is not wasted training — this is where the movement gets refined
- Your nervous system recovers here and comes back stronger
Train it first in your session when your nervous system is fresh — never at the end of a workout when you’re already fatigued. The deadlift rewards the people who show up consistently over months and years, not the ones who go too heavy too soon.
Accessory Work
The deadlift is already doing a lot. The accessories below are not about adding volume for its own sake — they’re about targeting the specific weaknesses that limit the lift and building the kind of foundational strength that makes the main movement safer and more powerful over time.
| Exercise | What It Targets | Why It Helps |
|---|---|---|
| Romanian Deadlift | Hamstrings, glutes, lower back | Builds posterior chain strength and reinforces the hip hinge pattern under constant tension |
| Farmer Carries | Grip, core stability, traps | Directly addresses grip as a limiting factor and builds the kind of braced carry strength that transfers to heavy pulls |
| Barbell Row | Upper back, lats, traps | Strengthens the muscles responsible for keeping the bar against your body and maintaining a neutral spine under load |
| Rack Pulls | Upper back, lockout strength | Overloads the top portion of the lift where many people lose tension — builds confidence with heavier loads |
| Deficit Deadlift | Leg drive, hamstring strength off the floor | Increases range of motion and strengthens the hardest part of the pull — the first inch off the floor |
| Good Mornings | Lower back, hamstrings, glutes | Teaches you to maintain spinal position under load — directly carries over to keeping your back flat through the pull |
| Glute Bridge / Hip Thrust | Glutes, hip extension | Isolates the glutes for lockout strength and gives the lower back a break from heavy pulling |
| Back Extension | Spinal erectors, glutes, hamstrings | Builds the erector endurance that keeps your lower back flat through a full working set — not just one clean single |
If you already have the Romanian deadlift and glute bridge in your training from the beginner and intermediate tier, you’re already building the right foundation. The farmer carries and barbell rows are the two I would add first — grip and upper back are the things that tend to limit the deadlift before posterior chain strength does.
Muscles Worked — What’s Actually Happening
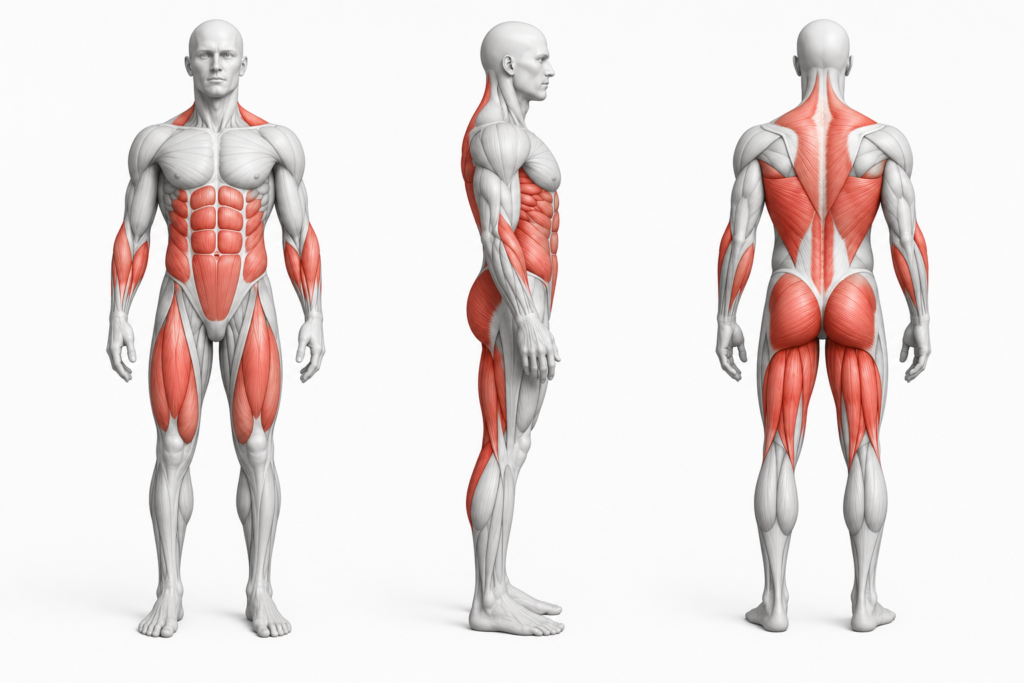
The conventional deadlift is the most complete expression of full body strength training available with a barbell. No other single movement demands this much from this many systems simultaneously, which is why it sits at the top of the hinge progression and why serious lifters never fully abandon it.
The primary movers are your glutes and hamstrings. These are the engines of the lift — they generate the force that drives the bar off the floor and power the hip extension that locks the lift out at the top. If your glutes and hamstrings are weak, the deadlift will expose it immediately. The posterior chain work in the accessory section exists specifically to address this.
Your spinal erectors — the muscles running along either side of your spine — work isometrically throughout the entire lift. They are not moving you, they are holding you. Their job is to maintain the neutral arch in your lower back under load from the moment you brace to the moment the bar returns to the floor. This is why the brace matters so much. Without it, the erectors are working without support and the risk of injury climbs sharply.
Your lats, traps, and upper back control the bar path. They keep the bar against your body, prevent it from drifting forward, and maintain the rigidity of your upper back under load. Your core works the same way as your erectors — isometrically, holding pressure and position rather than producing movement. Your quads contribute off the floor as you drive your feet through the ground. Your grip, forearms, and biceps are working constantly to hold the bar in your hands. Even your feet are engaged, pressing actively into the floor throughout the pull.
Where This Fits
The conventional deadlift doesn’t exist in a vacuum. It’s one piece of a larger training foundation — and once you’ve got the mechanics down, it starts to make everything else feel more connected. If you want to understand where this lift sits inside a complete approach to getting stronger, The 3 Pillars of Fitness breaks down how training, nutrition, and mindset all work together — especially for beginners who are still figuring out how to structure their efforts.
The deadlift also pairs naturally with other big compound movements. If you’re building a serious lower-body and posterior chain foundation, learning how to do a barbell back squat alongside the deadlift is one of the smartest things you can do early on. The two lifts complement each other in ways that isolation work simply can’t replicate.
And if you’re starting to wonder what comes next once the basics feel solid, moving to advanced compound lifting covers exactly that — what actually changes when you step up the intensity and start treating these lifts seriously.
One thing beginners often overlook is what happens between sessions. Heavy deadlifts are demanding on the posterior chain, and how you eat and rest after training has a direct impact on how fast you progress. Eating to support recovery isn’t complicated, but it does matter — and it’s worth understanding before you push the weight much further.
Join The Conversation
If you’re just starting out with the deadlift I’d love to know how it’s going. What part of the lift are you finding hardest to get right — the setup, the brace, the wedge? Drop a comment below and let me know where you’re at. If you’ve been pulling for a while and something in this post clicked for you in a way it hadn’t before, I want to hear that too. This is the lift I care most about getting right and I’m always happy to talk through it.