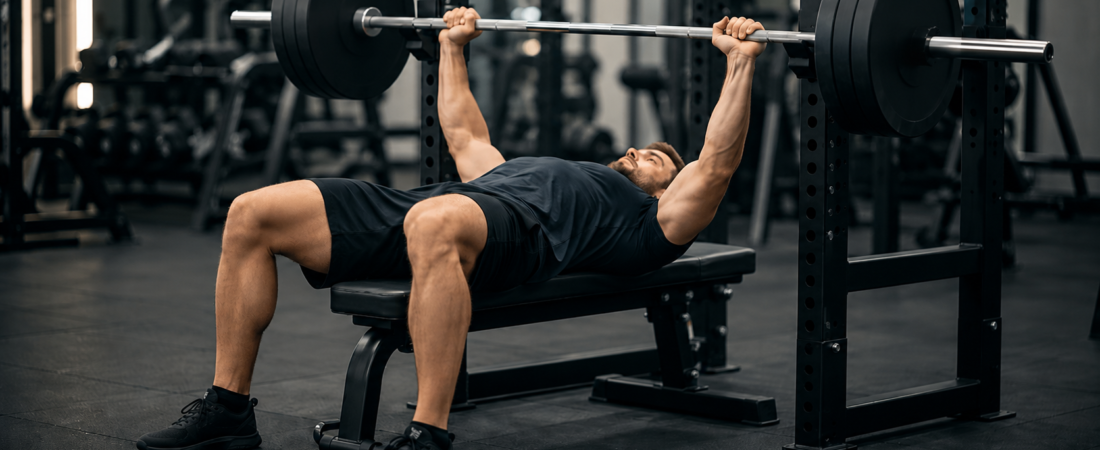
The first time I benched properly was because someone who knew what they were doing showed me before I had a chance to develop bad habits. He walked me through the setup — retract the scapula, align yourself with the bar at eye level, feet pressed into the floor, back locked into the bench. Then he put just the bar in my hands and told me to press it slow and controlled.
I couldn’t believe how hard it was. My chest and triceps were on fire for days. As a chef that was a problem — my arms were so sore for the first couple of weeks that it actually made work harder. But that soreness told me something was working that had never been worked properly before.
The mistakes I made when training alone were predictable. Elbows flared too wide, shoulders taking load that should have gone to the chest, too much weight too soon — especially without a spotter, which in hindsight could have ended very badly. The one that nearly did end badly was grip. I dropped 90kg on my chest because my wrists tilted under the load. Fortunately I was bracing into the chest so it bounced rather than pinned me, but if the weight had been heavier that story ends differently. Wrist position under a loaded bar is not something to figure out as you go.
I’ve used the bench press consistently ever since — as a chef it’s one of the most efficient movements I can do. Five solid sets of bench covers most of the front upper body in one session. My focus now isn’t chasing personal records. It’s building consistent strength with perfect form while protecting my shoulders for the long term. That shift in priority — from how much to how well — is what I think most people doing this lift need to hear.
This guide covers the barbell bench press from setup to execution, the common faults that cause injury or stall progress, how to programme it intelligently, and the accessory work that keeps the shoulders healthy enough to press for years. The Smith machine bench press sits in the intermediate tier of this progression — if you haven’t worked through that yet it’s worth starting there first.
What Is This Exercise?
A barbell bench press is a horizontal pushing exercise where you lie on a bench and press a loaded bar upward from your chest. It trains the chest, shoulders, and triceps — the pushing muscles of the upper body.
What you need: A barbell, a bench, and a rack.
This is a horizontal push movement — you press weight away from your chest, the same motion you use pushing a heavy door open.
Who This Is For
This guide is written for someone who has worked through the foundational pushing movements — incline push-ups, Smith machine bench press — and is ready to move to the barbell. You don’t need to be strong. You need to be ready to learn the movement properly before loading it.
If you’re coming from the Smith machine tier on this site you’ll already understand the pressing pattern, how to set your upper back, and what it feels like to engage the chest rather than let the shoulders take over. That foundation matters here. The barbell bench press removes the fixed bar path of the Smith machine and places the full demand of stability and control on you. That’s where the real development begins — and where the real risks appear if the setup isn’t right.
This is also a guide for anyone who has been benching for a while but suspects their form has never been properly dialled in. If your shoulders always feel it more than your chest, if your wrists ache under heavier loads, or if you’ve been adding weight without adding understanding — this is for you. The bench press is one of the most commonly performed and most commonly performed poorly exercises in any gym. Getting it right changes everything about what it can do for you.
Sets & Reps
The barbell bench press is not a movement to load aggressively while you’re still learning it. The bar alone is 20kg and for many people coming from the Smith machine or dumbbell work, that’s enough to feel the movement properly and build the pattern before adding anything else.
When you’re learning the movement:
- 3 sets of 5 to 8 reps with the bar or very light weight
- Focus entirely on setup, scapular position, and bar path
- Rest fully between sets — 2 to 3 minutes minimum
- If a rep feels wrong stop the set and reset
When the pattern feels solid:
- 3 to 4 sets of 6 to 10 reps at a challenging but controllable weight
- Every rep should look identical — consistent bar path, consistent elbow angle, consistent contact point
- This is your technique and strength building range — don’t rush past it
When you’re ready to push:
- 3 to 5 sets of 3 to 6 reps at 75 to 90% of your estimated max
- Never push to a weight where form breaks down — especially without a spotter
- Keep a lighter technique week in between heavier sessions
One session per week focusing on heavy bench is enough for most people. A second session at lower intensity focusing on technique and volume is a smart addition when recovery allows. Never bench heavy without either a spotter or safety pins set correctly — the consequences of a failed rep without either are serious.
How To Bench Press — The Complete Sequence
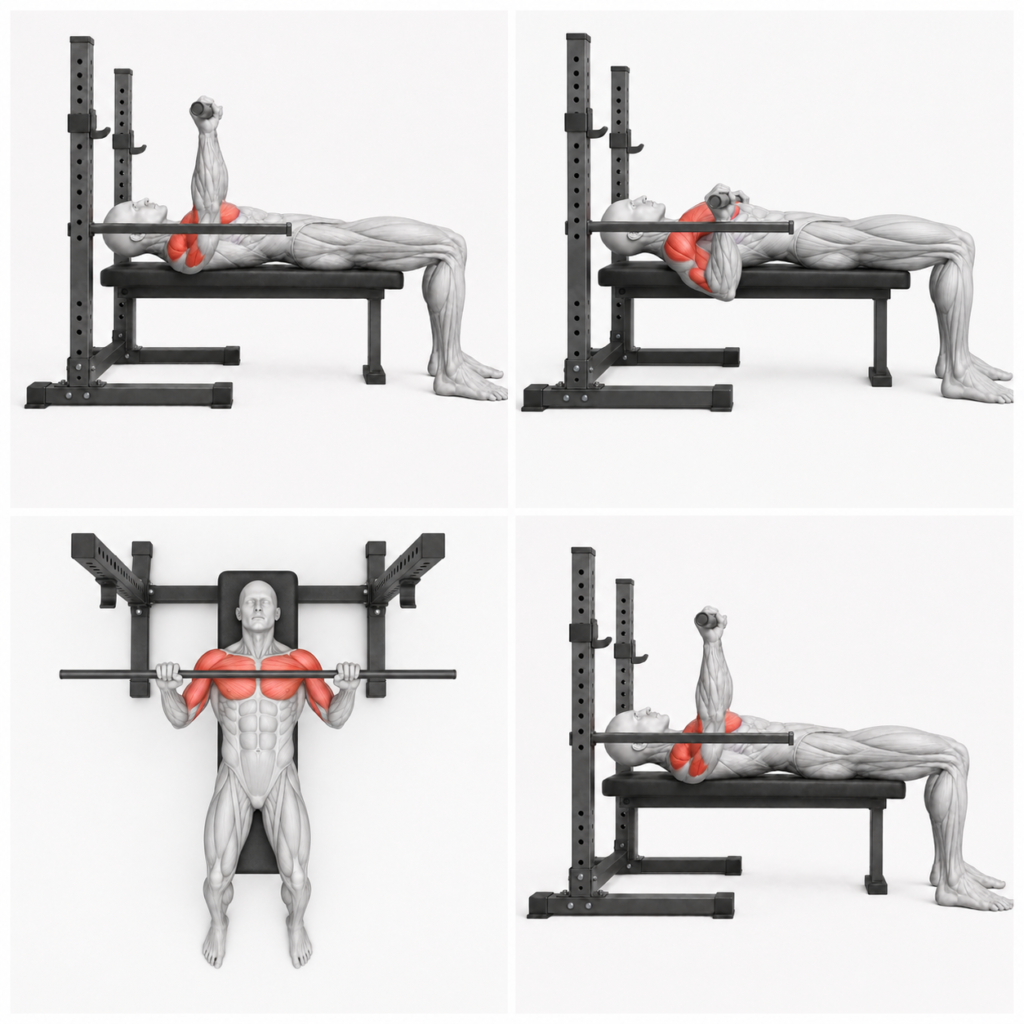
Top right — bottom position side view 2: Chest loaded, shoulder blades retracted into the bench throughout the descent. The bar comes to you — you don’t collapse toward the bar.
Bottom left — top down view: From above you can see the grip width, elbow angle, and bar position over the lower chest clearly. Elbows tracking at 45 to 70 degrees — not flared wide, not tucked tight.
Bottom right — lockout side view: Full extension, bar directly over the lower chest not drifted back over the face. Chest, triceps and shoulders all contributing to the lockout. Every rep finishes here before the next descent begins.
The Setup
- Set the bar so your arms are almost fully extended when gripping it from the bench — just 1 to 2 inches of clearance above the hooks. If you have to reach up or shrug your shoulders forward to unrack it the bar is too high. Set safety bars just below the height of the bar when it touches your chest with your natural arch.
- Lie on the bench with your eyes directly under the bar
- Pull your shoulder blades back and down — retract and depress them firmly into the bench
- Create a slight natural arch in your lower back — upper back and glutes stay in contact with the bench
- Feet flat on the floor, pressed firmly into the ground
- Grip the bar just outside shoulder width — thumbs wrapped fully around the bar
- Bar sits in the heel of the palm, not across the fingers — wrists stacked directly under the bar, neutral
The Brace
- Take a deep breath and brace into your chest — expand it upward and outward
- This lifts the chest toward the bar and creates the rigid platform you press from
- Drive your feet into the floor — full body tension from feet to hands
- Hold that brace for the entire rep
The Unrack
- Drive the bar straight up to clear the uprights
- Move it horizontally until it sits directly over your lower chest
- Do not begin the press from over your face or upper chest
The Descent
- Lower the bar in a controlled arc toward your lower chest — nipple line
- Elbows at 45 to 70 degrees from your torso — not flared to 90, not tucked to your sides
- Keep your shoulder blades retracted throughout the descent
- Bar touches the chest with control — no bounce, no pause unless specifically training paused bench
The Press
- Drive the bar back up along the same arc to lockout over the lower chest
- Push your feet into the floor as you press — leg drive transfers force through the whole body
- Hips stay on the bench throughout
- Lock out fully at the top — chest, triceps, and shoulders all contributing
The Rerack
- Move the bar horizontally back over the uprights
- Lower it onto the rack with control
- Never drop it onto the hooks from height
The Detail
The setup is everything. Before the bar moves a single inch everything that determines whether the press is safe and effective has already happened. Lie on the bench and position yourself so the bar is directly above your eyes when your arms are extended — this puts it in the right place to unrack horizontally over your lower chest without having to press it away from above your face. Pull your shoulder blades back and down hard into the bench — not just back as you might think, but down simultaneously, depressing them so they’re locked firmly against the pad. This creates a stable base for the press and protects the shoulder joint by keeping it in a mechanically sound position throughout the movement. From here find your natural arch — not an exaggerated powerlifting arch, just the natural curve your lower back creates when your shoulder blades are properly retracted. Upper back and glutes stay in contact with the bench. Feet press firmly into the floor. Grip the bar just outside shoulder width with the bar sitting in the heel of your palm — low in the hand, directly over the strong bones of your forearm. Wrap your thumbs fully around the bar. Wrists stay stacked directly under the bar throughout the entire movement. Never use a thumbless grip on the bench press.
Take a deep breath and brace into your chest — expanding it upward and outward rather than into your belly. This lifts the chest toward the bar and creates the rigid upper body platform you press from. Lock that tension in and maintain it for the entire rep. Drive your feet into the floor as you press — leg drive isn’t just for squats and deadlifts. Pressing your feet into the ground creates full body tension that transfers force through the entire kinetic chain and gives your press a more stable base to work from. When you unrack, drive the bar straight up to clear the hooks and then move it horizontally until it sits directly over your lower chest. Do not begin descending from above your face. The bar travels in a slight diagonal arc — from above the lower chest at lockout, down to the nipple line at the bottom, and back up along the same arc. That arc is not an accident. It’s the natural path the bar takes when your elbows are at the correct angle and your shoulder blades are locked in.
The descent is where most people first lose control. Lower the bar slowly and with intent — the same controlled approach that applies to every compound movement. Your elbows should track at 45 to 70 degrees from your torso throughout the descent. Too wide at 90 degrees puts the shoulder in a vulnerable position and takes the chest out of the movement. Too tucked turns it into a close grip tricep press. The 45 to 70 degree range keeps the chest as the primary mover with the triceps and front deltoids contributing as they should. Keep your shoulder blades retracted throughout the descent — one of the most common faults is allowing the shoulder blades to wing forward as the bar comes down, which immediately compromises the shoulder joint. The bar touches your chest at the nipple line with control. No bounce. No pause unless you’re specifically training paused bench. Contact and drive.
The press is the reverse of the descent along the same arc. Drive the bar back up — push the ceiling away rather than thinking about lifting the bar. Keep driving your feet into the floor. Hips stay on the bench. The bar returns to lockout directly over the lower chest, not drifted back over the face or upper chest. At lockout your chest, triceps, and shoulders should all feel like they contributed. If your shoulders are the dominant feeling rather than your chest, your shoulder blades weren’t retracted properly or your elbows were too wide. Lock out fully, reset your breath, brace again, and begin the next rep. Every rep should look identical to the one before it. Rerack only when the full set is complete — move the bar horizontally back to the uprights and lower it onto the hooks with control.
Common Faults and How to Fix Them
Elbows flaring too wide Puts the shoulder in a vulnerable position and takes the chest out of the movement. Keep elbows at 45 to 70 degrees from the torso — not at 90. If your shoulders feel it more than your chest, this is why.
Shoulder blades releasing on the descent Retracting at setup means nothing if they wing forward mid rep. Actively hold the retraction from unrack to rerack. The shoulder blades stay locked into the bench throughout.
Bar drifting over the face at lockout The bar returns to over the lower chest — not the face or upper chest. Press slightly back toward your feet as well as up. The bar path is a diagonal arc, not a straight vertical line.
Wrists bending back under load The bar must sit in the heel of the palm over the forearm bones — not across the fingers. If wrists tilt back under heavy load use wrist wraps and add wrist curls as an accessory.
Bouncing the bar off the chest A bounced rep is a wasted rep. Lower with control, make contact, drive. If you need the bounce the weight is too heavy.
Hips rising off the bench Hips stay on the bench throughout. If they’re rising the weight is too heavy or fatigue has set in.
Too much weight without a spotter or safeties The bench press is the one lift where a failed rep can genuinely hurt you. Never push uncertain weight without a spotter or correctly set safety bars.
Programming
The bench press responds well to consistent, intelligent loading rather than chasing maximum weight every session. The shoulder joint is involved in almost every upper body movement you do — protect it by treating the bench press as a long term investment rather than a weekly test of your limits.
The approach that works is the same alternating intensity structure used for the squat and deadlift.
Week one — technique and volume
- 3 to 4 sets of 6 to 10 reps at 60 to 70% of your estimated max
- Focus entirely on bar path, scapular position, and elbow angle
- Every rep should look identical
Week two — working weight
- 3 to 5 sets of 3 to 6 reps at 75 to 85% of your estimated max
- This is where strength is built — but only if week one felt clean
- If something felt off in week one, repeat it before moving here
Every third or fourth week — deload
- Drop back to 60% and focus purely on technique
- The shoulder joint benefits from this more than almost any other structure in the body
- Come back sharper and stronger
One dedicated bench session per week is enough for most people. A second lighter session focusing on technique and volume is a smart addition when recovery allows — but never bench heavy twice in the same week without adequate recovery between sessions.
How often you can bench depends entirely on what else your body is dealing with. If you’re working long physical shifts, one quality session per week is not a compromise — it’s the right call. Your recovery capacity is finite and your job is already drawing from it. A second session only makes sense when your schedule and your body genuinely support it. If I had more time and less physical demand from work I’d bench more frequently — but I don’t, and training around that reality has kept me consistent and injury free far longer than ignoring it would have.
Train the bench press first in your upper body session when the nervous system is fresh. Never bench at the end of a session when shoulder stability and concentration are compromised by fatigue. And always — always — set your safety bars before you load the bar. Check them before every set. It takes ten seconds and it matters every time.
Accessory Work
The bench press is demanding on the shoulder joint and the muscles that support it. The accessories below are not about adding chest volume — they’re about building the shoulder health and structural strength that allows you to press consistently and safely over the long term.
| Exercise | What It Targets | Why It Helps |
|---|---|---|
| Band Pull-Aparts | Rear deltoids, scapular retractors | Directly counteracts the internal rotation of pressing — keeps the shoulders balanced and healthy |
| Face Pulls | Rear deltoids, external rotators, upper back | One of the most important shoulder health exercises available — builds the muscles that protect the joint under load |
| Cable External Rotation — Z Twist | Rotator cuff — infraspinatus, teres minor | Directly strengthens the rotator cuff through its full range — zero load, maximum benefit |
| Scapular Pull-Ups | Scapular control, serratus anterior | Teaches the shoulder blades to move and stabilise correctly — directly transfers to scapular retraction in the press |
| Close Grip Bench Press | Triceps, inner chest | Overloads the triceps specifically — stronger triceps means stronger lockout |
| Dumbbell Fly | Chest, anterior deltoid | Isolates the chest through a longer range of motion — builds the chest development the barbell press can’t fully access |
| Tricep Dips | Triceps, chest, front deltoids | Builds pressing strength and tricep mass that directly carries over to the barbell |
The shoulder health accessories — band pull-aparts, face pulls, the Z twist, and banded chicken wings — are not optional extras. They’re what keeps the shoulder joint functioning properly under consistent pressing load. I use a resistance band for dynamic shoulder warm-up work before every session. That preparation is as important as the session itself.
If you only add two things to your bench press training make it band pull-aparts and face pulls. Do them before you press as part of your warm-up and after you press as part of your cooldown. Your shoulders will thank you for it years from now.
Muscles Worked — What’s Actually Happening
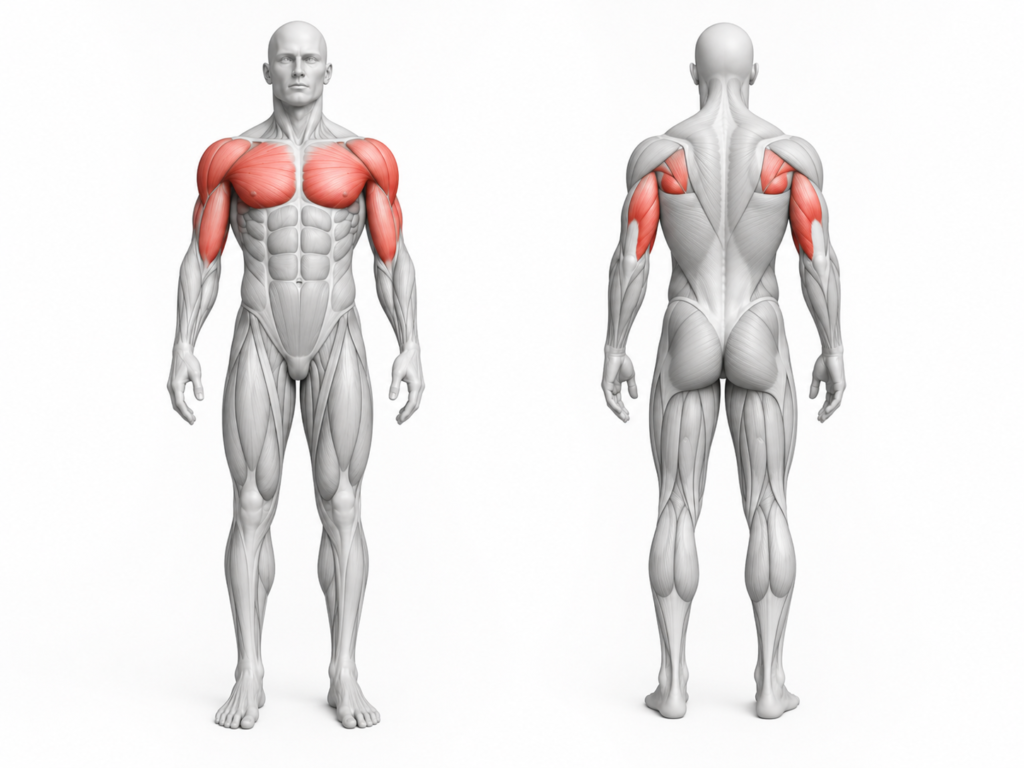
The barbell bench press is the most complete upper body pushing movement you can do with a barbell. It develops the chest, triceps, and shoulders simultaneously under heavy load — and that combination is why it sits at the top of the push progression.
The chest is the primary mover. It drives the bar off your chest and through the middle of the press. If your chest isn’t the dominant feeling during the lift your elbow angle or scapular position needs attention.
The triceps take over in the top half. From the midpoint to lockout the triceps are driving the rep to completion. Weak triceps show up as failed reps near the top — which is exactly what the accessory work addresses.
The front deltoids contribute throughout as a secondary mover — supporting the press from bottom to top. This is also why shoulder health work matters. A joint being loaded every pressing session needs to be properly maintained.
What surprises most people is how much the upper back is involved. Keeping the shoulder blades retracted throughout the press demands real work from the rhomboids and traps. The bench press is not just a chest exercise — it demands structural integrity from your entire upper body.
Where This Fits
The barbell bench press sits at the top of the push progression on this site. The incline push-up built the foundational pressing pattern. The Smith machine bench press introduced load in a controlled environment. This is where both of those movements were pointing — a free barbell, full stability demand, and the most complete upper body pressing stimulus available.
What the bench press gives you beyond the lift itself is significant. The shoulder health work in the accessory table builds a level of rotator cuff stability and scapular control that carries over into every pushing and pulling movement you do. The tricep strength developed here shows up in your dips, your overhead press, and your lockout on every rep of everything. The upper back engagement required to press safely builds the same structural integrity that protects you in rows and pull-ups.
The bench press pairs naturally with the barbell row — the horizontal push and horizontal pull working together to keep the shoulders balanced and the upper body developing evenly. If you haven’t worked through the band rows and seated cable row progressions yet, those are worth building alongside your bench work.
The advanced tier on this site is built around the barbell back squat, the conventional deadlift, and this lift. Train them together, programme them honestly, protect the joints that make them possible, and give them time. That’s how this compounds.
Join The Conversation
The bench press is one of those lifts that looks simple from the outside and reveals its complexity the longer you train it. If you’re just starting out — what variation are you currently working with and what’s feeling hardest to get right? If you’ve been pressing for a while — has there been a cue or a realisation that changed how the lift felt for you? Drop a comment below. The details that made the difference for you might be exactly what someone else needs to hear.