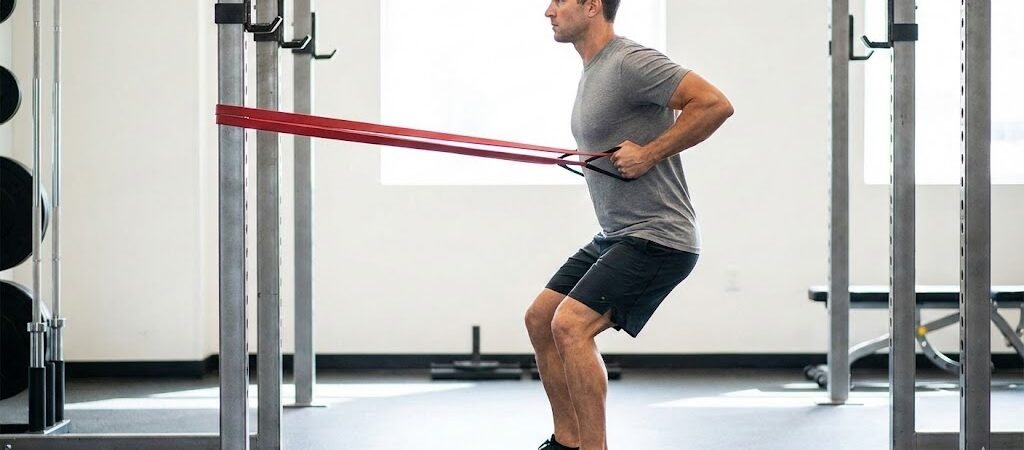
Pulling is a natural movement. But when you’re new to training, it isn’t always obvious where to start or how to do it well.
Some beginners jump straight onto machines or heavier exercises and do fine. Others aren’t sure what they should be feeling, how to protect their shoulders, or how to tell they’re progressing safely.
This post is for that second group.
Band rows and inverted rows are a clear, low-risk way to learn how to pull properly. The habits you build here carry over into every row and pull-up you do later.
They’re not the only way to train your back — but they’re a reliable starting point if you want to move well and stay healthy.
If you’re new to training and want to see how this fits into a simple beginner routine, read how to structure your workouts as a beginner.
What Is a Row?
A row is a pulling movement — you pull something toward your chest or torso. The muscles doing the work are primarily in your upper and mid-back: the lats, rhomboids, and mid traps. Your biceps assist on every variation, and your rear shoulders stabilise the joint throughout. These are the same muscles that drive every pull-up and prevent your shoulders rounding forward under load.
This post covers three variations, each building on the last:
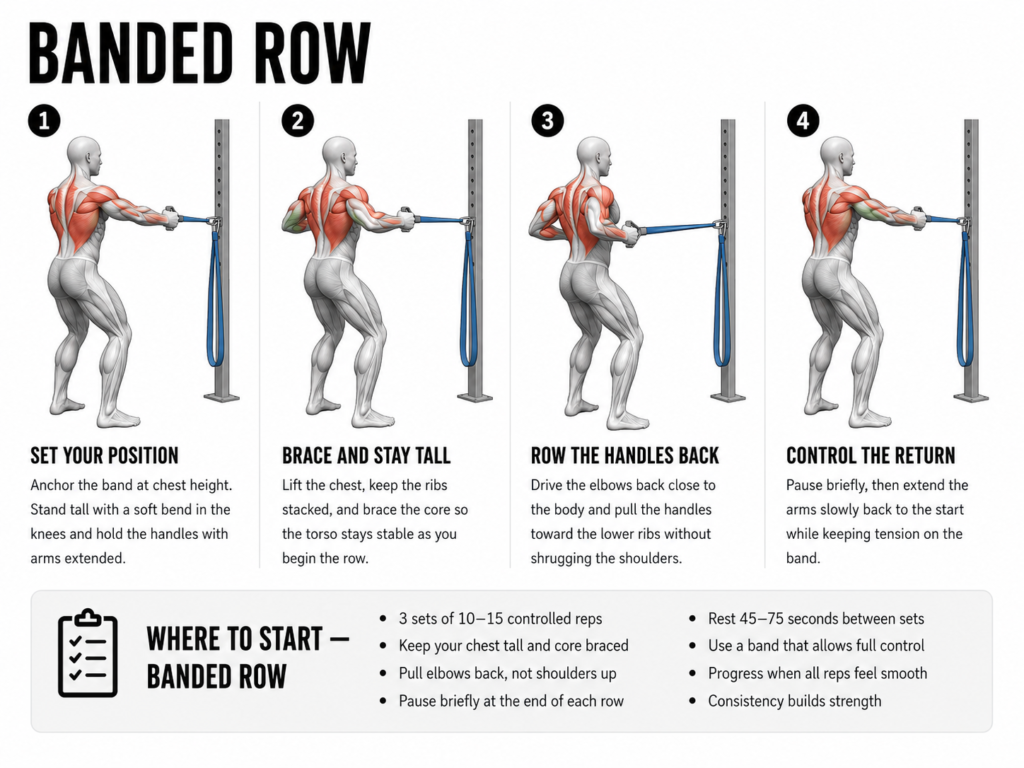
Standing anchored band row — a band anchored at chest height, pulled toward you while standing upright. Your body is fully supported and the pull is relatively upright, which makes this the clearest place to feel what a row should feel like: shoulder blades drawing back and down, elbows driving back, a pinch between the shoulder blades at the top.
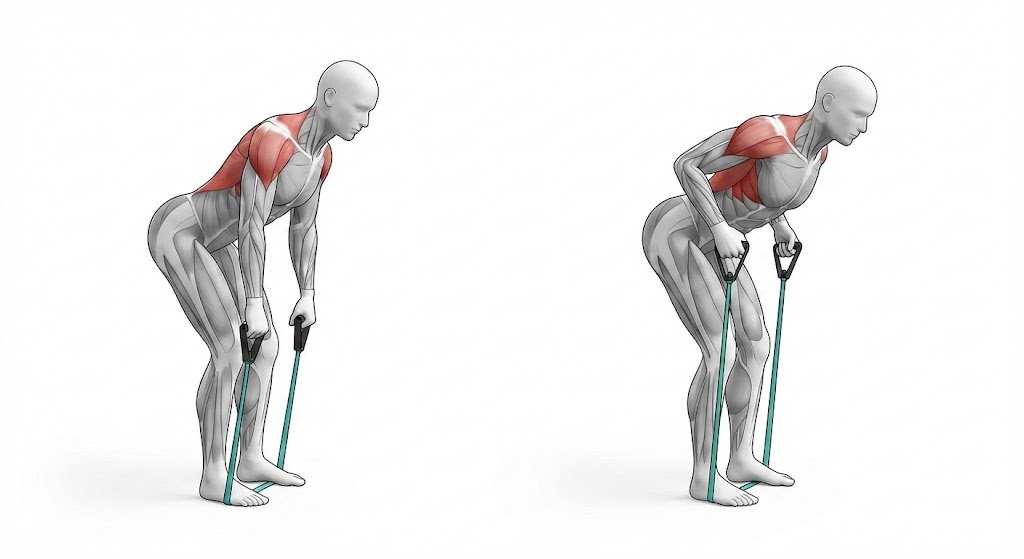
Bent-over band row — the same pulling motion with a hip hinge added. Once your torso is angled forward, gravity is constantly trying to round your back — so your hamstrings, glutes, and lower back have to hold that hinge steady while your lats and mid-back do the pulling. That’s what actually makes this version harder, and it’s much closer to how rows are performed with dumbbells and barbells.
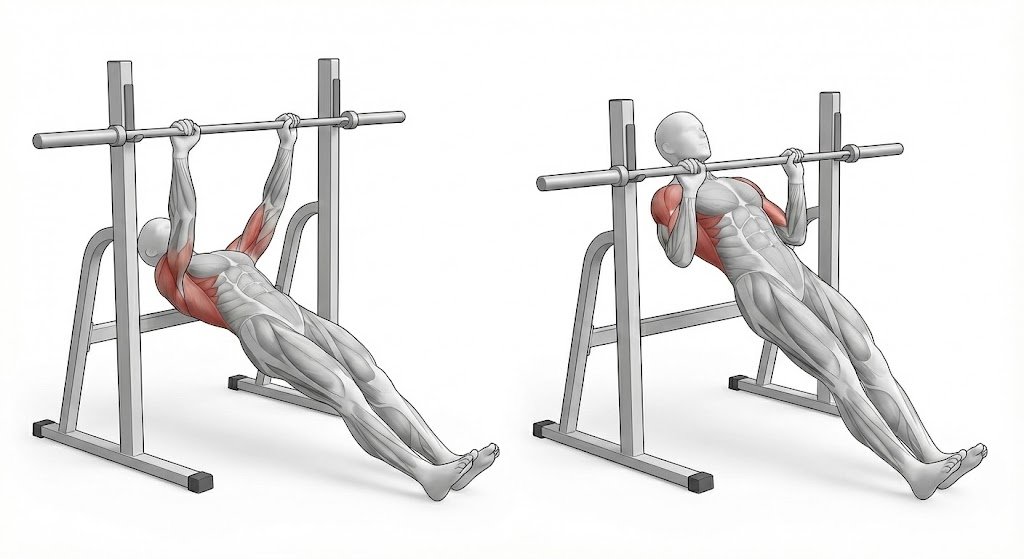
Inverted row — a bodyweight row where you pull your chest up to a bar while your body hangs beneath it at an angle. The back is now working against your full bodyweight, your core has to hold a plank-like position throughout, and the demand on the lats and mid-back is the highest of the three. This is the version with the strongest carryover to pull-ups.
You don’t need to use all three. Start with the variation that feels controlled and repeatable, and build from there.
Standing Anchored Band Row
Sets & Reps
- 2–4 sets
- 10–15 controlled reps
- 60–90 seconds rest
- Use a band light enough that you can move slowly, pause briefly at the top, and finish every rep with good posture
- If form starts to slip, reduce tension or stop the set
This variation shows a standing band row with the band anchored in front at about chest height.
What’s Happening Here
From the start position, the arms are extended and the band is under light tension.
As you pull, the elbows travel back close to the body and the shoulder blades draw together.
The torso stays upright and stable throughout — the movement comes from the upper back, not the lower back or neck.
This makes it a great option if you’re:
- New to training
- Learning how to pull for the first time
- Wanting to focus on shoulder control
Where You Can Do This
This version can be performed:
- In a gym, using a squat rack or upright post
- At home, using a sturdy anchor point
As long as the anchor is secure and roughly chest height, the movement stays the same.
About the Band
You can use:
- A resistance band with handles
- A simple loop band like the one shown above
Both work equally well.
The key is that the band provides smooth, controllable resistance, allowing you to focus on form rather than load.
What to Focus On
- Stand tall with a neutral spine — back flat, not rounded or arched
- Set your shoulder blades back and down before you start pulling, not as part of the pull itself
- Pull with your elbows, not your hands — your hands are just holding the band
- Move slowly and stay under control throughout
You should feel a pinch between your shoulder blades at the top of each rep, along with tension running down the muscles along the sides of your back — that’s your back doing the work, not your arms. If you mostly feel this in your biceps or forearms, you’re pulling with your arms first instead of driving your elbows back.
Bent-over band Row
Sets & Reps
- 2–4 sets
- 10–15 controlled reps
- 60–90 seconds rest
- Use a band light enough that you can move slowly, pause briefly at the top, and finish every rep with good posture
- If form starts to slip, reduce tension or stop the set
The bent-over band row uses the same pulling pattern as the standing variation — but with one important difference: it requires you to hinge at the hips and support your torso while you pull. That extra demand changes how the exercise feels and what it trains.
You should feel your hamstrings and glutes holding the hinge position, and your upper back doing the actual pulling. If your lower back is the loudest thing you feel by the end of a set, you’ve lost the hinge — you’re rowing with your spine instead of your hips.
What Changes Compared to the Standing Version
When you hinge forward:
- Your upper back works against gravity
- Your lower back and hips help stabilize the position
- Your body learns to stay strong and controlled while pulling
This makes the movement closer to how rows are performed with:
- Dumbbells
- Barbells
- Heavier loads later on
In other words, it bridges the gap between simple band work and more traditional rowing exercises.
Why It Can Be Useful
The bent-over version is helpful if you:
- Are comfortable hinging at the hips
- Want to build more total-body tension
- Are preparing for heavier row variations in the future
It reinforces the habit of keeping a neutral spine — back flat, not rounded or arched — while pulling, a skill that carries over into many other lifts.
Why the Standing Version Still Matters
The standing anchored row exists for a reason.
Some people:
- Struggle to hinge properly at first
- Have lower-back limitations
- Simply want to focus on the upper-back movement without extra fatigue
The standing version removes the hinge so you can learn to pull without distractions.
Both variations train the same pulling muscles.
The difference is how much your body has to support the movement.
How to Choose Between Them
- If you’re unsure or just starting → standing version
- If hinging feels comfortable and controlled → bent-over version
Neither is “better.”
They’re tools for different stages.
Inverted Rows: Adding Bodyweight
Sets & Reps
- 2–4 sets
- 6–12 controlled reps
- 90 seconds rest
- Adjust difficulty by bending your knees (easier), straightening your legs (harder), or changing the bar height if available
Once band rows feel controlled and confident, inverted rows are a natural next step.
Instead of pulling a band, you’re now pulling your own bodyweight.
This increases the challenge and adds:
- Greater upper-back demand
- More core involvement
- Stronger carryover to pull-ups later on
What Changes Compared to Band Rows
- Your body stays in a straight line from shoulders to heels
- The resistance is your body angle, not the band
- Control matters more than speed
You should feel your whole body working to stay straight, not just your back doing the pulling. If your hips sag toward the floor, or your lower back is what’s sore afterward, your core is losing the position — that’s the plank part of the movement breaking down, not your back failing.
If this feels too difficult at first, you can:
- Bend your knees
- Raise the bar height
This allows you to scale the movement while keeping the same technique.
Muscles Worked
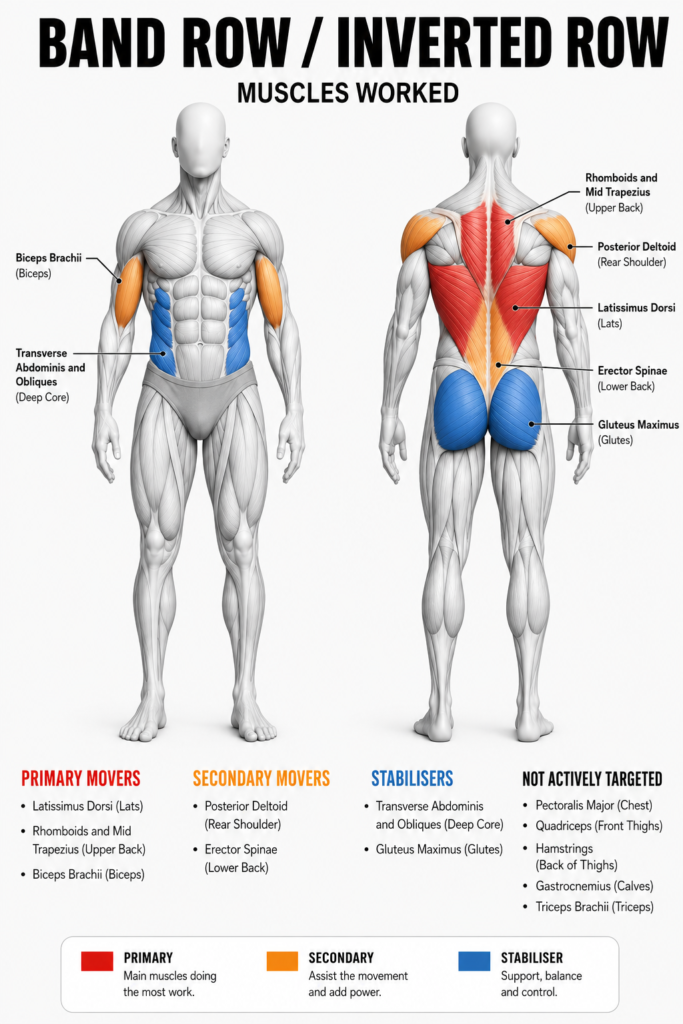
Primary Muscles:
- Lats (Latissimus Dorsi): The main driver of the pull — brings your elbows back and down toward your body.
- Rhomboids & Mid Traps: Squeeze your shoulder blades together at the top of every rep.
- Biceps: Bend at the elbow to assist the pull on every variation.
Secondary Muscles:
- Rear Delts: Support shoulder stability as the arms travel back.
- Core: Stabilises the torso — barely involved in the standing version, much more demanded in the bent-over and inverted versions, where nothing else is holding your position for you.
Why It Matters
Pulling movements play a quiet but important role in how your body feels and how it looks.
Training your back properly helps:
- Keep the shoulders balanced and stable
- Reduce unnecessary neck and upper-back tension
- Support good posture in daily life
- Improve pressing strength and overall training balance
It also has a clear visual impact.
Consistent pulling work develops the muscles of the upper and mid-back, creating:
- More width through the lats
- Better upper-back thickness
- A stronger, more athletic-looking torso
For many people, this is where noticeable changes start to appear.
Band rows teach the pulling pattern.
Inverted rows add bodyweight resistance.
Together, they build the foundation for both healthy movement and visible back development — without rushing into advanced exercises.
Who This Is For
This approach is for anyone who wants to build pulling strength without rushing or guessing.
It’s especially useful if you:
- Are new to training and want a clear place to start
- Feel unsure whether you’re “doing rows right”
- Want to protect your shoulders and upper back long term
- Prefer simple, repeatable movements over complicated programs
You don’t need to train every variation shown here.
Choose the version that feels controlled, comfortable, and repeatable — and build from there.
Band Row and Inverted Row FAQs
What is the difference between a band row and an inverted row?
A band row pulls a band toward you while standing — your body is fully supported, which makes it the clearest place to learn what a row should feel like. An inverted row is a bodyweight row: you hang beneath a bar and pull your chest up to it, working against your full bodyweight while your core holds a plank-like position. It’s the hardest of the three variations and has the strongest carryover to pull-ups.
Are band rows effective for beginners?
Yes — band rows and inverted rows are a clear, low-risk way to learn how to pull properly. The habits you build here carry over into every row and pull-up you do later. Start with the variation that feels controlled and repeatable and build from there.
What muscles do rows work?
Primarily the upper and mid-back — the lats, rhomboids, and mid traps. The biceps assist on every variation and the rear shoulders stabilise the joint throughout. These are the same muscles that drive every pull-up and prevent the shoulders rounding forward under load.
How many band rows should I do?
2–4 sets of 10–15 controlled reps with 60–90 seconds rest, using a band light enough that every rep stays controlled — the shoulder blades drawing back and down, elbows driving back, a pinch between the shoulder blades at the top.
Where This Fits
Band rows and inverted rows are just one piece of the puzzle. On their own, they’ll build pulling strength — but that strength compounds when it’s part of a routine that’s actually structured and sustainable.
Band rows and inverted rows are bodyweight-regulated — you control the difficulty by adjusting your body angle, not by adding external load. The seated cable row picks up from there: a fixed, controllable way to add real resistance to the same horizontal pulling pattern once bodyweight alone stops being enough.
If you want to see how all the foundational movements fit together, Beginner Gym Workouts for Strength is a solid next read. It gives you a clearer picture of how pulling, pushing, and lower body work slot into a balanced training week — without overcomplicating things.
And if you’re working toward pull-ups — which most people are once pulling feels more natural — Band Assisted Pull-Ups for Beginners picks up right where this post leaves off. That’s the logical next step once inverted rows start feeling too easy.
Beyond the training itself, it’s worth remembering that strength is built during recovery, not during the session. Why Recovery Matters breaks that down in plain terms — and it’s something a lot of beginners overlook early on.
If you want to understand how training, nutrition, and mindset all connect at the foundation level, The 3 Pillars of Fitness brings it together in one place. That’s the bigger picture this post sits inside.
If you’re working through the pulling variations here and something feels unclear — or you’re unsure when to progress — drop a comment and say which variation you’re on. That’s usually enough to work out what to adjust.