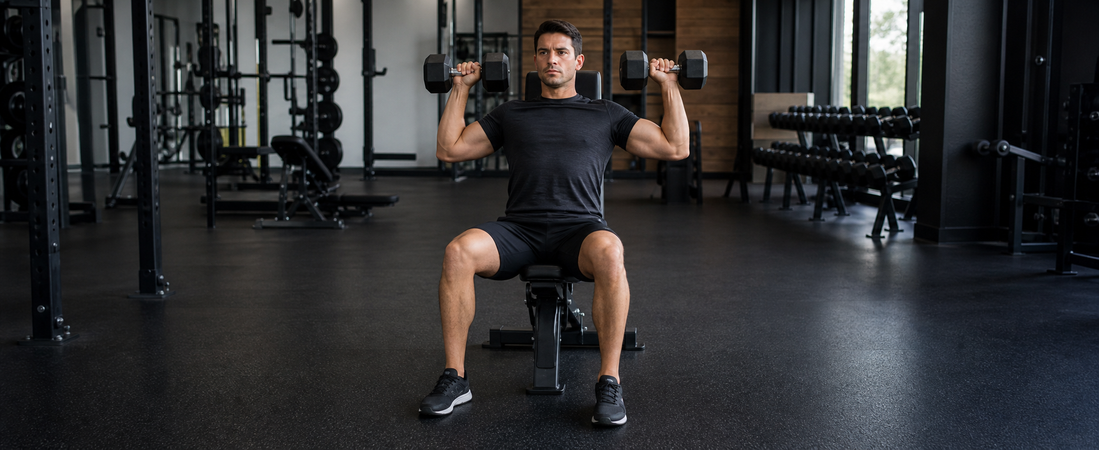
The seated dumbbell shoulder press is the version of overhead pressing that lets your shoulders do their own work. Sit down, put your back against a pad, and everything your body would otherwise spend holding you upright goes quiet — so the effort lands where you wanted it, and you find out what your shoulders can actually press.
It also tells you something a barbell hides: which of your two sides is weaker. That matters more than it sounds, and it’s most of why this is the press to learn first.
What Is a Seated Dumbbell Shoulder Press?
You sit on an upright bench with a dumbbell in each hand at shoulder height, and press them straight up until your arms are locked out overhead. Your shoulders do the pressing, your upper chest helps, and the backs of your upper arms finish the movement at the top.
The seated part is the whole design. Pressing something overhead while standing asks your trunk, hips and legs to hold you rigid for the entire set — a real demand, and one that quietly fails before your shoulders do. Sitting removes it. What’s left is a pressing movement you can actually judge, because nothing else is propping it up.
Dumbbells rather than a bar matter for a second reason. Two independent weights each have to be pressed by the arm holding them, so neither side can borrow from the other.
What You Need
- A pair of dumbbells — light ones. Around 10kg (22lb) each is a sensible starting point, and less is completely fine.
- A bench with an upright back, or any sturdy seat that supports your back to shoulder height.
- A resistance band for warming up. Pressing cold is uncomfortable and the first sets never sit right; a few minutes of band pull-aparts beforehand changes how the whole session feels.
How To Do It
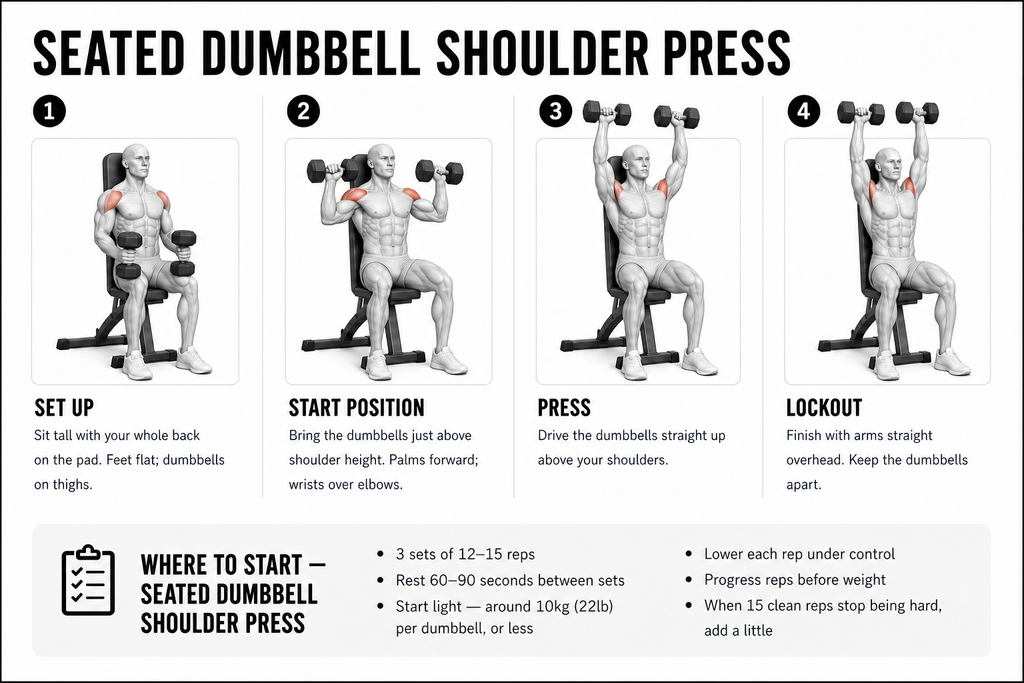
- Set the bench upright — the back pad vertical or one notch back. Sit with your whole back against it and your feet flat on the floor.
- Get the dumbbells to shoulder height. Rest them on your thighs first, then kick them up one at a time with your knee as you lean back. Don’t try to curl them into position.
- Start position: dumbbells just above shoulder height, palms facing forward, wrists stacked over your elbows, back against the pad.
- Press both dumbbells straight up until your arms are straight overhead. They should finish above your shoulders — not drifting out sideways, not clanging together.
- Lower under control back to shoulder height. The way down is training too, so don’t just drop them.
How Many Sets and Reps?
- Sets: 3
- Reps: 12–15
- Rest: 60–90 seconds
- Load: light — start around 10kg (22lb) per dumbbell, or less
Keep it light and keep the volume up. The shoulders aren’t a big muscle group and there’s nothing to gain from treating them like one. Some people will start at 15kg (33lb) and be fine, some will find 5kg (11lb) plenty, and the only figure that matters is the one you find challenging and can control.
Progress the reps before the weight. When 15 clean reps stop being hard, add a small amount — and if your form goes with it, you’ve found your ceiling for now and you go back down.
What Is Proper Seated Dumbbell Shoulder Press Form?
The steps get the weight up. These three positions decide whether it’s your shoulders doing it.
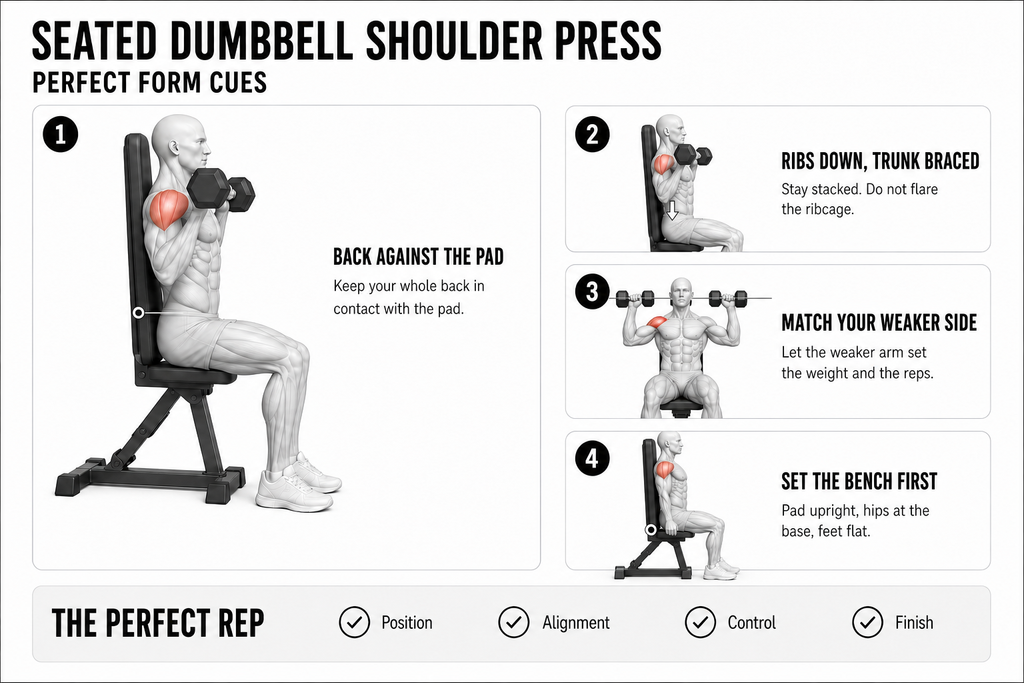
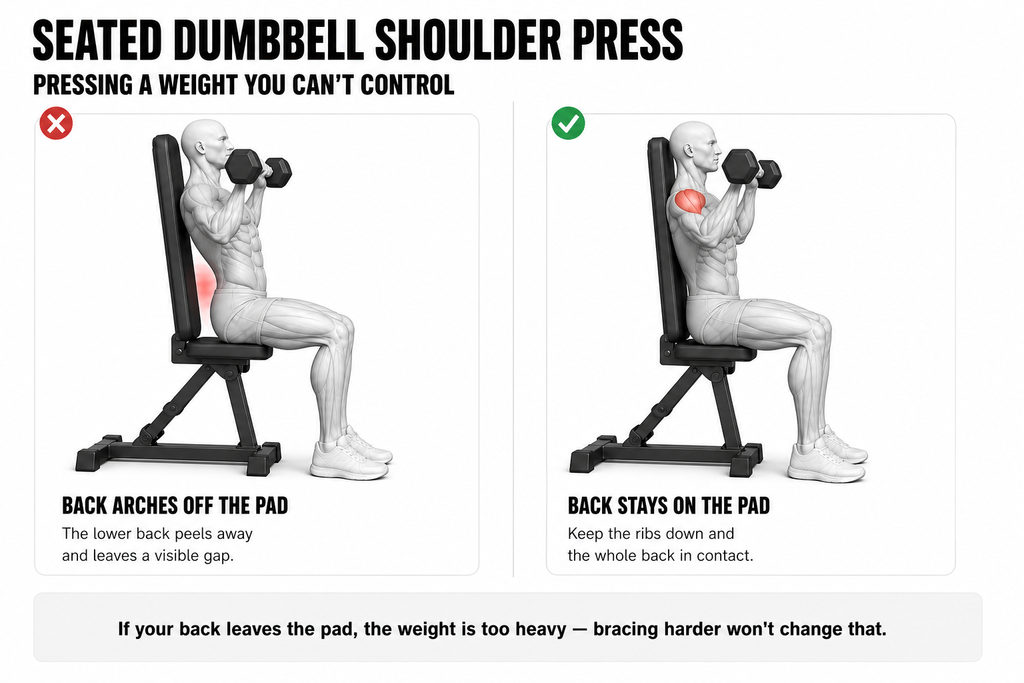
Keep your whole back against the pad. This is the one that matters most, because it turns an invisible fault into a physical one. The pad is behind you for the entire set, so the moment your lower back peels away from it you have your answer without needing to guess. Treat that gap as information rather than something to squeeze shut — if your back is leaving the pad, the weight is too heavy, and bracing harder doesn’t change that.
Ribs down, trunk braced — steady, not straining. Your ribs flaring upward is the first movement in an arch, before anything visible has happened, so keeping them down stops it at the start. Braced here means holding a position, not bearing down as hard as you can: you should be able to breathe. If bracing has become an effort of its own, it’s compensating for load.
Match your weaker side. Press each side with the same weight and the same reps, and let the weaker arm decide both. Dumbbells are what makes this possible — they expose the gap inside a single set, where a bar hides it and lets the stronger side quietly carry the weaker one. Letting the strong arm set the pace trains the difference in rather than out.
None of this is available if the bench is wrong. Set the pad vertical or one notch back, sit with your hips right at the base of it, and keep your feet flat on the floor — that’s what puts your whole back in contact with the pad, and the cues above are only readable once it is.
What You Should Feel
The work should sit at the front of your shoulders, with your upper chest joining in and the backs of your upper arms finishing the lockout. The effort lives between your shoulders and your hands; underneath, your trunk is braced and quiet, holding position rather than fighting for it.
Seated, with your back on the pad, that’s most of what there is to feel — which is the point of the exercise.
The signal that something has gone wrong arrives before any pain does: the sense that the weight is being held up by your spine rather than by your chest and shoulders, with your mid back bending and tensing to support it. The rep might still go up. It might even look fine to someone watching. When you feel that, lower the weight — that set, not next session.
What Muscles Does the Seated Dumbbell Shoulder Press Work?
It works your shoulders first — the front of the deltoid (the muscle that caps your shoulder) does most of the pressing — with your upper chest assisting and your triceps (the back of your upper arm) straightening your arms at the top.
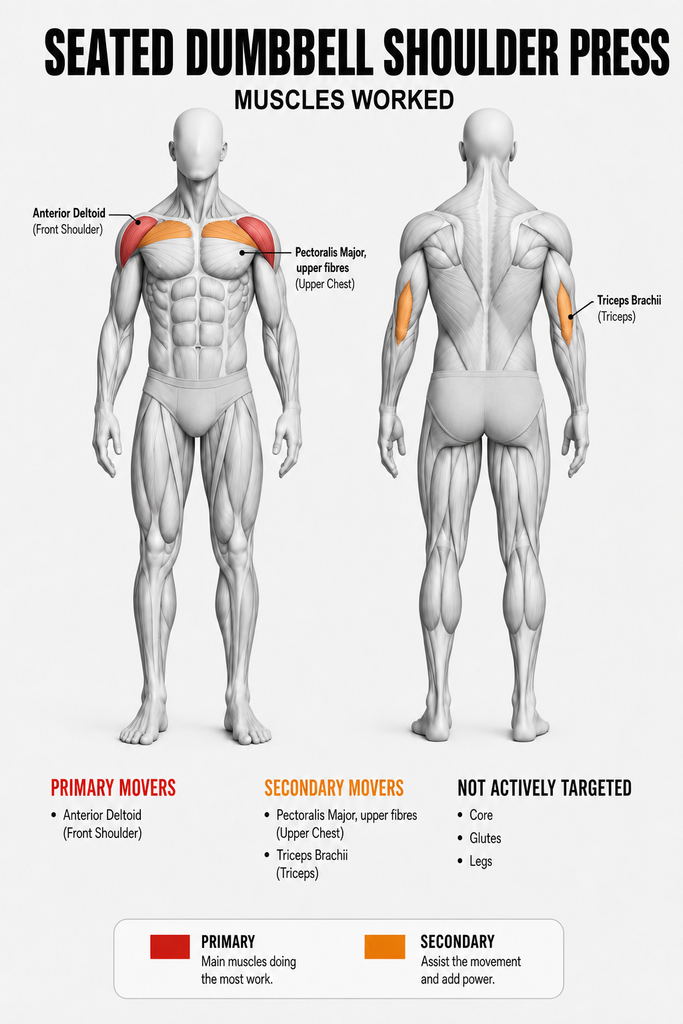
What’s missing from that list is the interesting part. Press standing and everything holding you rigid — trunk, glutes, lower body — works the whole set too. Sit down and that second list goes quiet, which is exactly why this version lets the pressing muscles learn the movement first.
What Are Common Seated Dumbbell Shoulder Press Mistakes?
Pressing dumbbells you can’t control. The tell: your reps turn into pushes — a shove off the shoulders, a wobble at the top, your lower back starting to peel off the pad. Why it creeps in: progress on the shoulders is slower than on most lifts, so the weight goes up before the control does. The fix: the load rule above — the weight you can press for controlled reps with your back on the pad is the right weight, whatever the number is.
Letting the strong side set the pace. The tell: one dumbbell locks out first, rep after rep, or the last reps on one side go up clean while the other grinds. Why it creeps in: most training before this was two-handed, where the stronger side has been covering the difference all along. The fix: the weaker arm chooses the weight and the rep count, and both sides get exactly that. The gap closes within weeks if you let it, and never closes if you don’t.
Pressing cold. The tell: the first sets feel stiff and vaguely wrong, and the dumbbells feel heavier than the same weight did last session. Why it creeps in: warm-ups are the first thing dropped when time is short. The fix: a few minutes of band work before you press, every session.
Benefits & Why It Transfers
This one earns its place by doing several things at once — shoulders, upper chest, triceps — which makes it efficient when you haven’t got long to train. Built seated and with dumbbells, it does something else as well: it finds the weaker side and fixes it, so the strength you end up with is even rather than lopsided.
The transfer is unusually direct, too. Life puts things overhead constantly — luggage into racks, boxes onto shelves — and every one of those is a shoulder press with worse form. Learning to press a controlled weight from a stable position is the same skill, minus the surprise.
How To Programme It & Where It Fits
Pressing goes on your upper-body or chest days, after your main pressing work rather than before it. Warm up with band work first, every time.
Get this version controlled and even side to side, and standing barbell pressing becomes available to you — with your back staying out of the conversation. If you’re already pressing standing and your lower back is taking the load, this is the version to come back to while you sort that out.
If you’re building a week’s training and not sure where pressing goes, how to structure your workouts as a beginner lays out the order.
Seated Dumbbell Shoulder Press FAQs
Is the seated dumbbell shoulder press better than standing?
It isn’t better, it’s earlier. Standing asks your whole body to hold you rigid while your shoulders press, which is a real demand and a useful one — but it’s a second job layered on top of the first. Seated removes it so you can build the pressing itself. Most people should own this version before adding the standing one back.
Why is one arm weaker than the other?
Because it always was, and a barbell was hiding it. Two-handed pressing lets the stronger side take a bigger share without anything telling you, so the difference sits there for years. Dumbbells reveal it within a single set. It isn’t a fault — it’s information, and it closes if you let the weaker arm set the weight and the reps.
How heavy should I start?
Lighter than you think, and around 10kg (22lb) per dumbbell is a reasonable first guess. The number itself isn’t the standard — controlled reps with your back on the pad is. If you can’t get 12 clean, the weight is wrong regardless of what it says on the end.
Join The Conversation
When you switch from pressing with a bar to pressing with two dumbbells, how big is the gap between your sides on the first session? That number surprises most people, and it’s worth knowing.