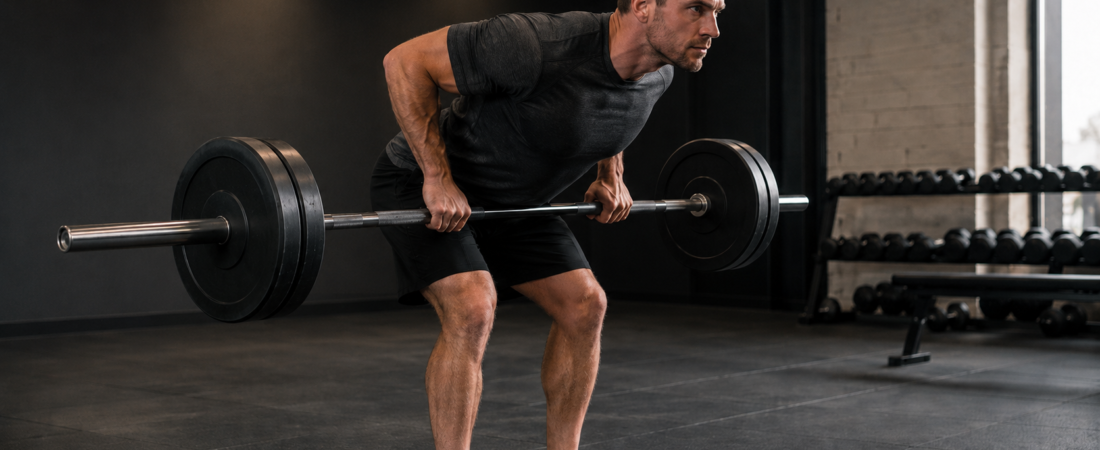
The barbell row wasn’t a movement I took to immediately. It’s demanding in a way that isn’t obvious until you try to do it properly — holding a heavy hinge position while pulling with your back rather than your arms is harder than it looks. Early on I was probably going too heavy and not leaning far enough forward, which turned it into more of a shrug than a row. The back wasn’t doing the work it should have been.
What changed my relationship with it was understanding what it was actually for. The barbell row builds back thickness and lat width in a way that almost nothing else does. It strengthens grip. It directly supports the deadlift — the heavier and more consistent my rows became the more my deadlift improved. Those benefits are undeniable and they’re why I never miss it on back day.
It’s also one of those movements where the weight on the bar is an honest measure of whether your form is holding up. If you can’t maintain the hinge position at a given weight the bar is too heavy. That’s not a weakness — that’s the movement telling you something useful. Listen to it and build from there.
This guide covers the barbell row from setup through execution, the grip variations that target different parts of the back, common faults and how to fix them, and how to programme it alongside your other pulling work.
What Is This Exercise?
A barbell row is a horizontal pulling exercise where you hinge forward at the hips and pull a loaded bar toward your lower chest or abdomen. It trains the back, biceps, and rear shoulders — the pulling muscles that balance out pressing work.
What you need: A barbell.
This is a horizontal pull movement — you pull weight toward your chest, the same motion you use pulling a heavy drawer open.
Who This Is For
This guide is written for someone who has worked through the foundational horizontal pulling movements — band rows, seated cable row — and is ready to move to the barbell. The pattern is the same. The demands are significantly higher.
If you’re coming from the seated cable row you’ll already understand what it feels like to pull with your back rather than your arms, how to retract your shoulder blades at the top of the movement, and what lat engagement actually feels like. That foundation matters here because the barbell row removes the stability of the machine and places the full postural demand on you. You’re holding a hinge position under load for the entire set. That’s where the real development begins.
This is also a guide for anyone who has been rowing for a while but suspects their form has never been properly dialled in. If your lower back always takes it more than your lats, if the weight feels like it’s in your arms rather than your back, or if your torso rises with every rep — this is for you. The barbell row done properly is one of the most effective back builders available. Done poorly it’s just an expensive way to fatigue your lower back.
If you’re coming to this movement without the band row or cable row foundation that’s fine — but take the weight seriously. Start lighter than you think you need to. The barbell row will tell you quickly whether your back is ready for the load you’ve chosen.
Sets & Reps
The barbell row is a compound movement that demands postural strength for the entire set. Your lower back, hamstrings, and core are working isometrically to hold the hinge position while your back does the pulling. That combination makes it more taxing than it appears and more important to programme conservatively at the start.
When you’re learning the movement:
- 3 sets of 6 to 8 reps at a light, controlled weight
- Focus entirely on maintaining the hinge position and feeling the lats engage
- Rest fully between sets — 2 to 3 minutes minimum
- If the torso rises or the lower back takes over, stop the set and reduce the weight
When the pattern feels solid:
- 3 to 4 sets of 6 to 10 reps at a challenging but controllable weight
- Every rep should look identical — same torso angle, same bar path, same contact point
- This is your strength and back development range — don’t rush past it
When you’re ready to push:
- 3 to 5 sets of 4 to 6 reps at 75 to 85% of your estimated max
- Heavier rowing demands more recovery — treat it with the same respect as the deadlift
- Keep a lighter technique week between heavier sessions
One to two sessions per week is appropriate for most people. If you’re deadlifting in the same week — which you should be — manage the total posterior chain demand carefully. The barbell row and the deadlift together are significant. Don’t programme both heavy in the same session.
Both grips train the same fundamental pattern. Alternating between them across your training builds a more complete back than either grip alone. Overhand grip — palms facing down, elbows flare slightly wider, bar travels to the lower chest. Targets the upper back — rhomboids, traps, and rear deltoids — building thickness across the mid and upper back.
How To Barbell Row — The Complete Sequence
The Setup
- Stand with feet hip-width apart, toes pointing slightly outward
- Grip the bar just outside shoulder width — overhand to start
- Hinge at the hips until your torso is close to parallel with the floor
- Knees slightly bent, not locked
- Bar hanging directly below your shoulders
- Spine neutral from hips to neck — chest up, not rounded
- Core braced, weight through the whole foot
The Brace
- Keep your core naturally engaged throughout the set — your torso must stay rigid
- Breathe normally between reps — exhale as you pull, inhale as you lower
- For heavier sets a more deliberate brace before each rep helps maintain position
- Your lower back and hamstrings are working isometrically — don’t let them switch off
The Pull
- Initiate the pull by driving your elbows back — not pulling with your hands
- Think about pulling your elbows behind your body, not lifting the bar up
- Bar travels to your lower chest — overhand grip
- Bar travels to your lower abdomen — underhand grip
- Squeeze your shoulder blades together hard at the top
- Pause for one second at the top — feel the back working
The Descent
- Lower the bar slowly and with control — 2 to 3 seconds down
- Let your shoulder blades spread as the bar descends
- Arms return to full extension at the bottom
- Maintain the hinge position throughout — do not let the torso rise
- Reset and pull again
The Detail
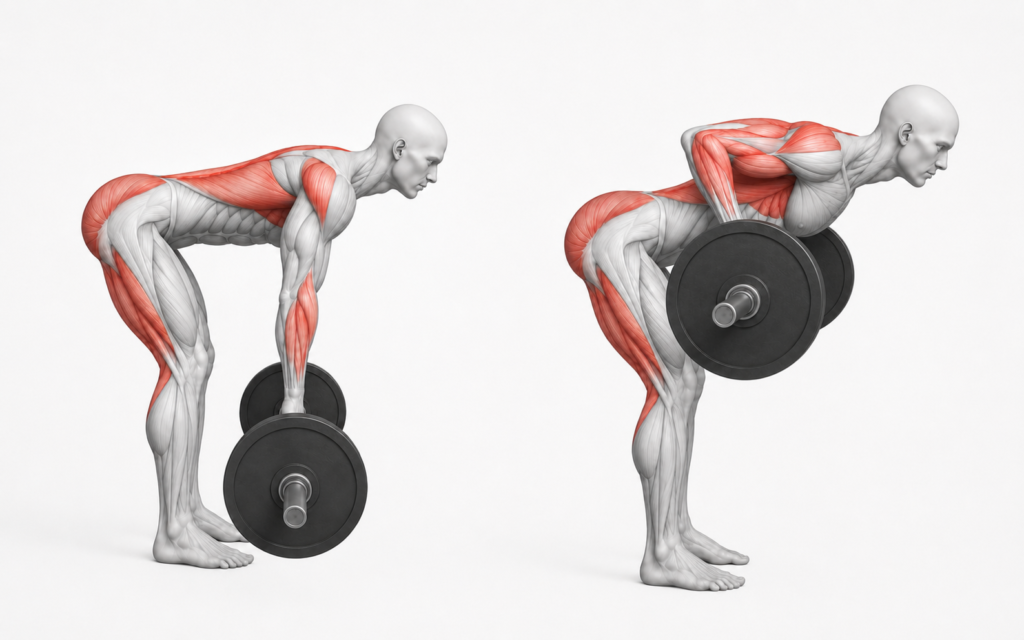
The setup determines everything that follows. Stand over the bar with feet hip-width apart and hinge at the hips until your torso is close to parallel with the floor — not at 45 degrees, genuinely close to horizontal. This is harder than it looks and it’s where most people cheat. The sharper the hinge the more demand it places on your posterior chain to hold the position, and the more honest it is as a test of whether the weight you’ve chosen is appropriate. If you can’t maintain that angle for the full set the bar is too heavy. Grip just outside shoulder width — overhand to start — with the bar hanging directly below your shoulders. Knees slightly bent, spine neutral from hips to neck, chest up. Your lower back, hamstrings, and core are all working isometrically to hold this position for the entire set. That postural demand is part of what makes the barbell row so effective — and part of what makes it so easy to do poorly when the weight gets too heavy.
The pull is initiated by driving the elbows back — not by pulling with the hands. This is the most important cue in the movement and the one that separates a back exercise from a bicep exercise. Think about your hands as hooks and your elbows as the engine. Drive the elbows behind your body and the lats, rhomboids, and traps do the work. As the bar approaches your body squeeze your shoulder blades together — that retraction at the top is where the back muscles are working hardest. For overhand grip the bar travels to your lower chest. For underhand grip the bar travels to your lower abdomen — a meaningfully different contact point that reflects the different elbow path and the shift in muscle emphasis toward the lower lats. Hold the contraction at the top for one second. Feel the back working. Then lower with control.
The descent is where most people lose the gains they just earned. Dropping the bar quickly removes the eccentric load — the controlled lengthening of the muscle on the way down — which is a significant portion of the stimulus. Lower the bar over two to three seconds, letting your shoulder blades spread naturally as the arms extend. Return to full extension at the bottom before the next rep. Your torso angle must not change throughout the set. The moment the torso begins to rise the movement stops being a row and starts being a modified shrug. If you find your body rising to meet the bar rather than the bar meeting your body, the weight is too heavy.
The grip variation you choose changes what the row develops. Overhand grip with elbows flaring slightly targets the upper back — rhomboids, traps, and rear deltoids — building the thickness that shows from the side. Underhand grip with elbows tucked close to the body targets the lower lats — building the width that creates the V-taper visible from behind. Neither is superior. Both together build a complete back. Alternating between them across your training week or across your training cycle is the most complete approach — and it’s what I do. One session overhand, one session underhand, both at the same torso angle and the same controlled tempo.
Common Faults and How to Fix Them
Torso rising during the set The most common fault and the one that undermines the movement most completely. When the torso rises to meet the bar the row becomes a shrug and the back stops doing the work. If your body is rising the weight is too heavy. Drop it and maintain the hinge.
Pulling with the biceps instead of the back If your arms fatigue before your back does the biceps are driving the movement. Focus on driving the elbows back rather than pulling with the hands. Think of your hands as hooks — passive — and your elbows as the engine.
Not hinging far enough forward A 45 degree torso angle turns the row into a different exercise. Close to parallel is the target. The more horizontal your torso the more demand on the back and the more honest the movement becomes about whether the weight is appropriate.
No pause at the top Rowing to the contact point and immediately lowering wastes the most valuable part of the rep. Pause for one second at the top, squeeze the shoulder blades together, feel the back working. That contraction is where the development happens.
Dropping the bar on the descent The eccentric — the controlled lowering — is as important as the pull. Two to three seconds down, shoulder blades spreading naturally, arms returning to full extension. Dropping it quickly halves the stimulus.
Too much weight too soon The barbell row exposes ego lifting immediately. Form breaks down, the torso rises, the biceps take over, and the back gets almost nothing. Start lighter than feels necessary and build from there. The movement is honest — it will tell you when you’re ready for more.
Grip failing before the back does If your grip is the limiting factor before your back fatigues use chalk or straps for working sets. Grip strength matters but it shouldn’t be what ends your back session. Address grip directly with farmer carries rather than letting it cap your rowing volume.
Programming
The barbell row sits naturally alongside the deadlift in your training week — both are posterior chain movements that demand significant recovery. The way you programme them together matters as much as how you programme each one individually.
The same alternating intensity structure used for the squat, deadlift, and bench press applies here.
Week one — technique and volume
- 3 to 4 sets of 6 to 10 reps at 60 to 70% of your estimated max
- Focus entirely on torso angle, bar path, and feeling the back work
- Alternate overhand and underhand grip across sessions
Week two — working weight
- 3 to 5 sets of 4 to 6 reps at 75 to 85% of your estimated max
- This is where back thickness and strength are built
- Only push here if week one felt clean and controlled
Every third or fourth week — deload
- Drop back to 60% and focus purely on technique
- The hinge position under load benefits from a reset as much as any other movement
Programming alongside the deadlift: Never deadlift and barbell row heavy in the same session. Both movements load the lower back, hamstrings, and grip simultaneously. If you deadlift on Monday, row on Wednesday or Thursday at the earliest — and consider making one session heavier and one lighter rather than going hard on both in the same week. Your posterior chain has a finite recovery capacity. Respect it.
One to two dedicated rowing sessions per week is appropriate for most people. If you’re training the deadlift seriously, one heavy row session and one lighter technique session is the smarter split than two heavy sessions of each.
Accessory Work
The barbell row is already building significant back strength. The accessories below target the specific weaknesses that limit the row and the pulling pattern more broadly — grip, rear deltoid health, and the scapular control that makes every rep cleaner and safer.
| Exercise | What It Targets | Why It Helps |
|---|---|---|
| Farmer Carries | Grip, core stability, traps | Directly addresses grip as a limiting factor — builds the braced carry strength that transfers to heavy rows |
| Face Pulls | Rear deltoids, external rotators, upper back | Keeps the shoulder joint healthy under consistent pulling load — one of the most important shoulder health exercises available |
| Band Pull-Aparts | Rear deltoids, scapular retractors | Directly counteracts internal rotation from pressing — keeps the shoulders balanced and the rowing pattern clean |
| Seated Cable Row | Lats, mid back, rhomboids | Allows heavier loading in a supported position — builds the same pulling pattern with more volume and less postural demand |
| Dumbbell Row | Lats, upper back, grip | Unilateral work exposes and corrects side to side imbalances that the barbell version can hide |
| Deadlift | Full posterior chain | The barbell row directly supports the deadlift — and the deadlift directly supports the row. Both make each other stronger |
| Scapular Pull-Ups | Scapular control, serratus anterior | Teaches the shoulder blades to move and stabilise correctly — directly transfers to the retraction at the top of every row |
The face pulls and band pull-aparts are not optional extras if you’re rowing consistently. Horizontal pulling creates internal rotation of the shoulder over time — the rear deltoid and external rotator work is what keeps that balanced. Add them to your warm-up before rowing and your cooldown after.
The deadlift and barbell row relationship works both ways. Stronger rows build the upper back that keeps the bar against your body in the deadlift. A stronger deadlift builds the posterior chain that holds your hinge position in the row. Programme them together consistently and they compound each other over time. That’s not theory — it’s what actually happens when you treat accessories seriously rather than as an afterthought.
Muscles Worked — What’s Actually Happening
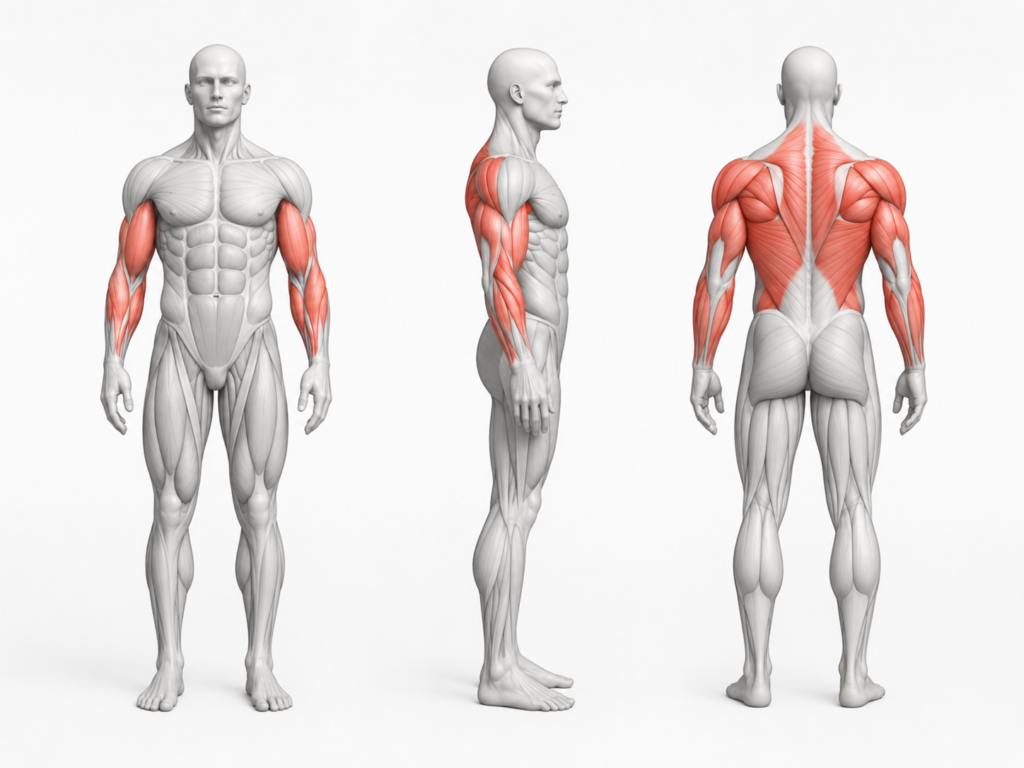
The barbell row is the most complete horizontal pulling movement available with a barbell. It develops the entire back simultaneously — thickness, width, and the postural strength that protects the shoulder joint under load — which is why it sits at the top of the horizontal pull progression and why serious lifters never fully abandon it.
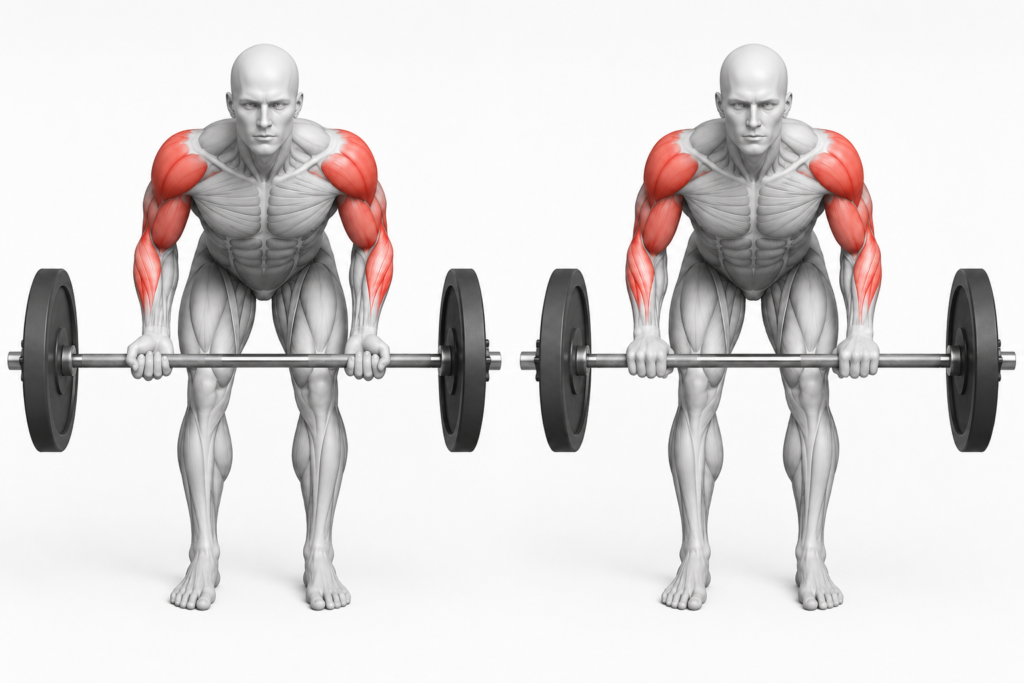
The primary movers are the latissimus dorsi and the upper back — rhomboids, trapezius, and rear deltoids. The lats drive the initial pull and control the bar path. The rhomboids and traps take over at the top, retracting the shoulder blades and creating the contraction that develops back thickness. Which of these dominates depends on your grip — overhand targets the upper back more heavily, underhand shifts the emphasis toward the lower lats. Both grips together build the complete back.
Your biceps contribute throughout as a secondary mover — they assist in elbow flexion on every rep. This is why the barbell row is one of the most effective bicep builders in any programme despite not being an isolation exercise. Your forearms and grip are working constantly to hold the bar through the full set. Your spinal erectors and hamstrings are working isometrically to hold the hinge position from the first rep to the last — which is why a heavy row session leaves your lower back and posterior chain fatigued in a way that feels similar to a deadlift session.
The barbell row is not just a back exercise. It’s a full posterior chain movement that demands and develops strength across everything from your grip to your hamstrings — and the back development it builds is the kind that shows up in every other lift you do.
Where This Fits
The barbell row sits at the top of the horizontal pull progression on this site. The band rows built the foundational pulling pattern. The seated cable row introduced load in a supported position. This is where both of those movements were pointing — a free barbell, full postural demand, and the most complete horizontal pulling stimulus available.
The barbell row pairs naturally with the barbell bench press — the horizontal push and horizontal pull working together to keep the shoulders balanced and the upper body developing evenly. If you’re pressing consistently without rowing consistently your shoulders will eventually tell you about it. The pulling work is what protects the joint that the pressing work loads. Train both and they reinforce each other. Neglect one and the other suffers over time.
The relationship between the barbell row and the conventional deadlift is worth understanding properly. The upper back strength built through consistent rowing is what keeps the bar against your body in the deadlift and maintains a neutral spine under heavy load. The posterior chain strength built through the deadlift is what holds your hinge position through a full rowing set. They are not competing movements — they are complementary ones. If you haven’t worked through the conventional deadlift guide yet that’s worth doing alongside this post.
The advanced tier on this site is built around the barbell back squat, the conventional deadlift, the barbell bench press, and this lift. Four cornerstones, each reinforcing the others. Train them together, programme them honestly, and give them time. That’s how the strength compounds.
Join The Conversation
The barbell row is one of those movements that rewards patience more than most. If you’re just starting out with it — what’s feeling hardest to get right, the hinge position, the lat engagement, or keeping the torso from rising? If you’ve been rowing for a while — has there been a cue or a realisation that changed how the lift felt? Drop a comment below. The details that made the difference for you might be exactly what someone else needs to hear.